Neutral Tile Cleaner

Bathroom Floor Grout Revamp Isleworth

Grout Revamp of a Ceramic Tiled Bathroom Floor in Isleworth

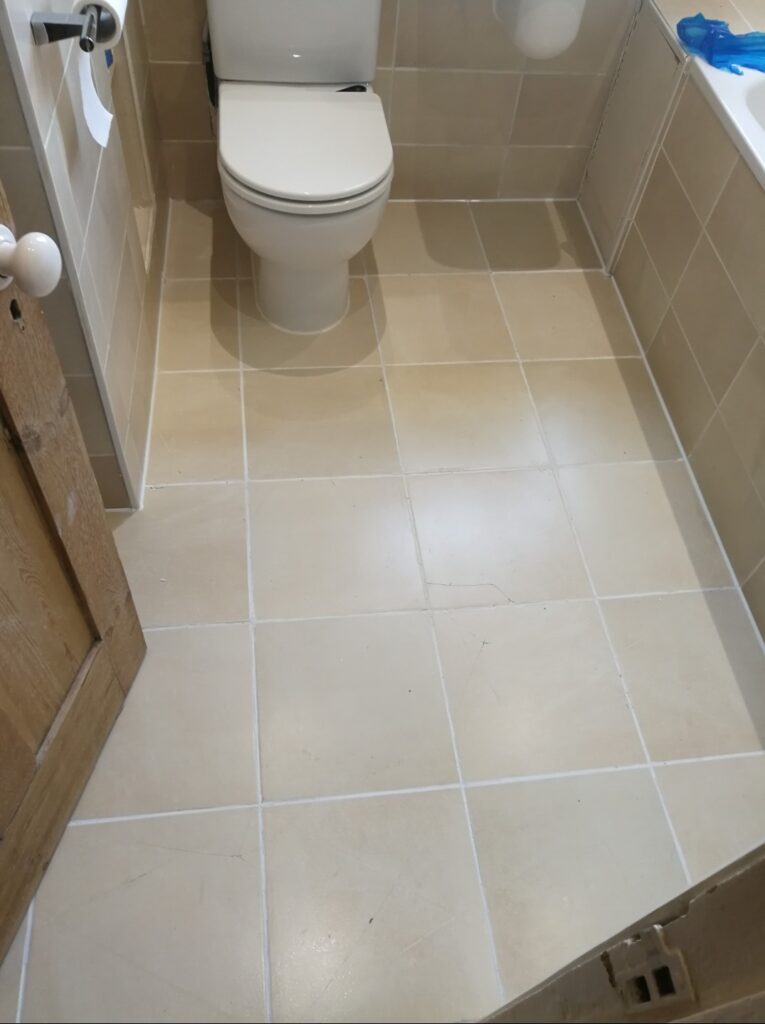
The Grout on this bathroom floor at a property in Isleworth was in quite a state and was bringing down the overall look of the bathroom. Ceramic tiles are impermeable so very easy to clean so although I would include giving them a thorough clean, I knew it was the grout that would be the most work.

Bathroom Floor Grout Before Restoration Isleworth

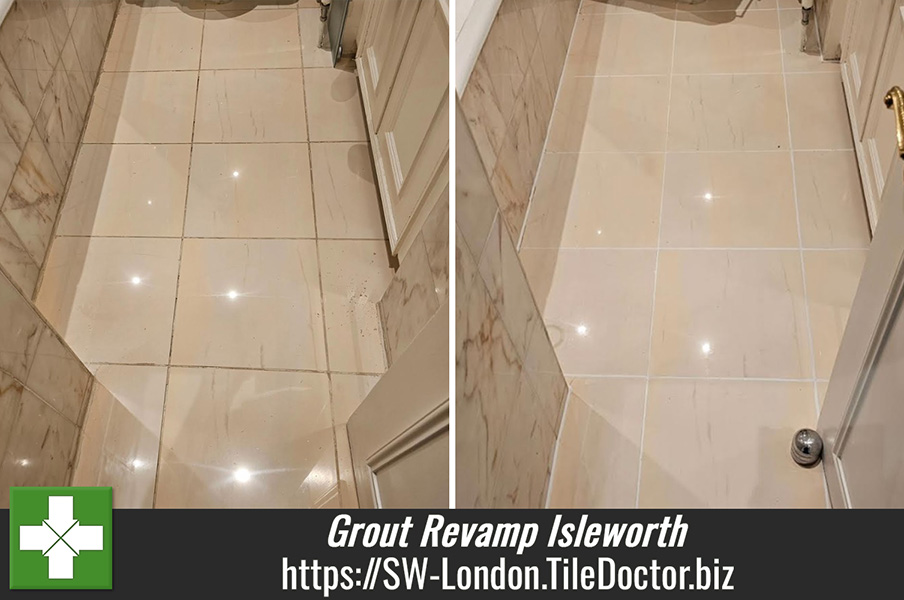
After taking a look, I realised that the staining was so deep cleaning wouldn’t give a consistent look so immediately recommended colouring the grout and replacing the tired silicone sealant all of which could be done in a day. Happy with my suggestion I worked out a quote which was accepted and a date agreed.

Deep Cleaning Grout on a Ceramic Tiled Floor

To start the grout was given a scrub using pre-treat cleaner, it’s comes in a spray bottle so it’s very easy to apply. It’s an effective ready-to-use cleaner designed to clean and lightly etch the grout to achieve a superior bond with the colourant which would come next.

As part of the cleaning, I also gave the ceramic tiles a light scrub with Tile Doctor Pro-Clean which is an alkaline Tile and Grout cleaning solution. The bathroom floor was a small area so this work was carried out by hand using a scrubbing brush. Once done the floor was rinsed with water and the soiling extracted with a wet vacuum until as dry as possible.

The next step was to strip out the silicone sealant between the tile and verticals; this is done using a sharp knife until all the remnants of silicone are removed. With that completed work moved on to colouring using a bottle of Tile Doctor Grout Colourant in White. The colourant is painted onto the grout line using a small brush and any excess wiped off the tile afterwards. Two coats of colourant were needed to achieve a consistent appearance.

To finish fresh anti-mould silicone sealant in White was applied between the floor tiles and vertical surfaces.

Bathroom Floor Grout After Restoration Isleworth

Once complete the bathroom looked fresh and crisp giving the impression of a new installation. For aftercare cleaning I like to recommend Tile Doctor Neutral Tile Cleaner along with a two-chamber mop and bucket that can keep clean and dirty water separate.


Professional Cleaning of Ceramic Tile and Grout in South London

Grout Revamp of a Ceramic Tiled Bathroom Floor in Isleworth Read More »

Multicoloured Slate Tiled Kitchen Floor Surbiton

Multicoloured Slate Kitchen Floor Cleaned and Sealed in Surbiton

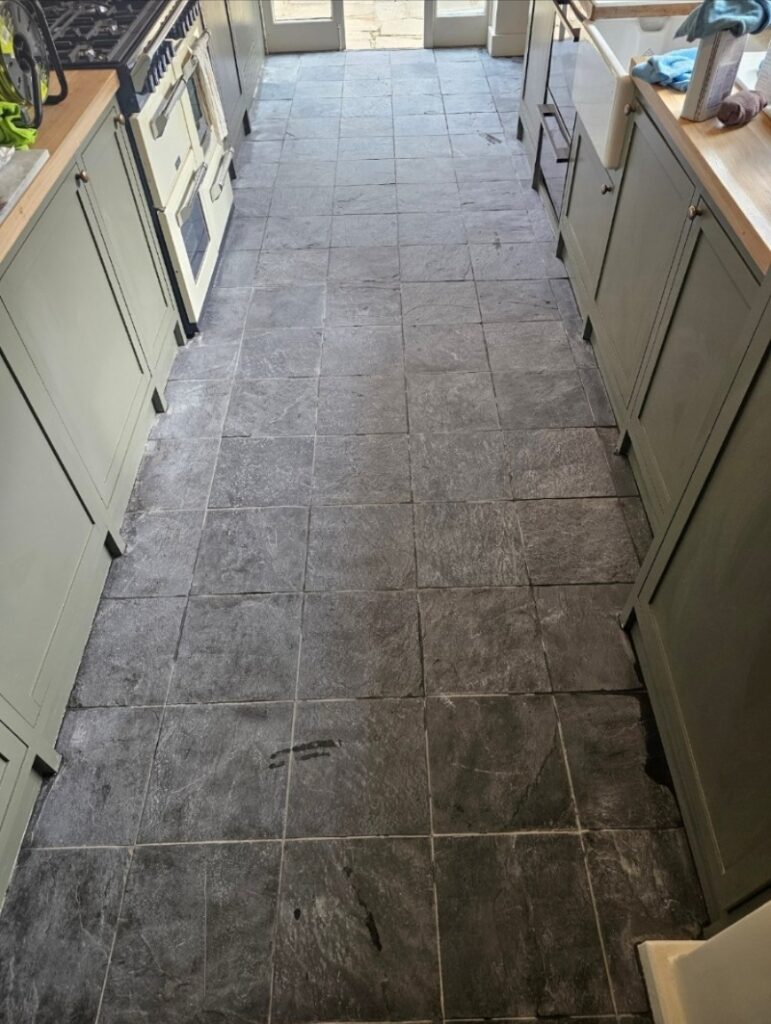
I was asked to visit a property in Surbiton to resolve a sealer issue with a Multicoloured Slate tiled floor that was laid in the Kitchen and adjacent dining area. The floor had been sealed professionally two years earlier and was showing signs of wear so the client decided to top up the sealer with three further coats. Unfortunately, the sealer went cloudy and the floor now looked awful.

I visited the property to work out a solution and it occurred to me the only guaranteed way to resolve the problem would be to strip the floor of sealer and re-apply. I worked out a detailed quote for the work which was accepted and a date set for the work to start.

Multicoloured Slate Kitchen Floor Before Cleaning Surbiton

Cleaning and Stripping a Multicoloured Slate Tiled Kitchen Floor

To strip off the sealer the floor was sprayed with a strong dilution of Tile Doctor Remove & Go and this was then left to soak into the Slate for ten minutes. Allowing the product to dwell gives it time to break down the sealer and contaminates. The floor was then scrubbed with a Victor Trojan floor buffer fitted with a black pad and an extra 65kg of weight to increase traction with the stone.

I brought along a colleague to work on this floor and worked backwards so as I scrubbed the floor with the Trojan he followed along with a Hyundai wet vacuum to remove the soiling. Removing the waste like these speeds up the operation allowing areas that need further attention to be dealt with quickly.

Multicoloured Slate Kitchen Floor During Cleaning Surbiton

Once the sealer was removed attention turned to the Grout which was cleaned with a dilution of Tile Doctor Pro-Clean scrubbed in by hand with a wire brush. The floor was then washed twice with clean water and a black pad to neutralise the floor and remove any trace of product. The wet vacuum was used again here to remove the dirty water.

Multicoloured Slate Kitchen Floor During Cleaning Surbiton

After a final mop the floor was dried as much as possible with the wet vacuum and then left to dry of naturally overnight.

Sealing a Multicoloured Slate Tiled Kitchen in Surbiton-Upon-Thames

The next day work started by verifying the Slate was dry using a damp meter which confirmed the floor had dried out. With that confirmation the floor was sealed with Tile Doctor X-Tra Seal buffing off the excess with a white buffing pad afterwards.

Tile Doctor X-Tra Seal was chosen for this floor as it’s an oil-based sealer and that add structure to the stone and works well to bring out its features and colour. It’s also extremely durable and leaves an attractive satin finish.

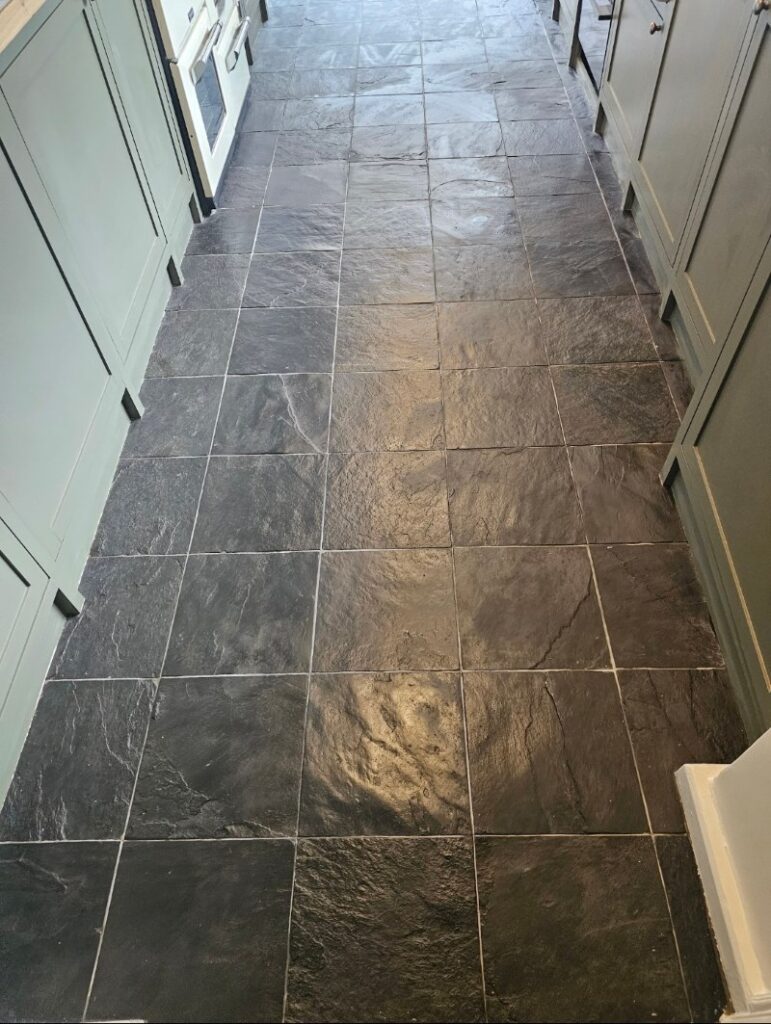
Multicoloured Slate Kitchen Floor After Cleaning Sealing Surbiton

The floor was transformed by the work and my client was extremely pleased with the result. For aftercare I recommended the use if Tile Doctor Neutral Tile Cleaner, it has a pH neutral formula that won’t impact the newly applied sealer. Typical household cleaning products tend to be bleach based and can strip off the sealer protecting the stone from ingrained dirt and so best avoided.

Multicoloured Slate Kitchen Floor After Cleaning Sealing Surbiton


Professional Renovation of a Multicoloured Slate Tiled Kitchen Floor in South London

Multicoloured Slate Kitchen Floor Cleaned and Sealed in Surbiton Read More »

Ceramic Tile and Grout Renovation Richmond

Colour Restored to Black Grout on a Ceramic Tiled Floor in Richmond

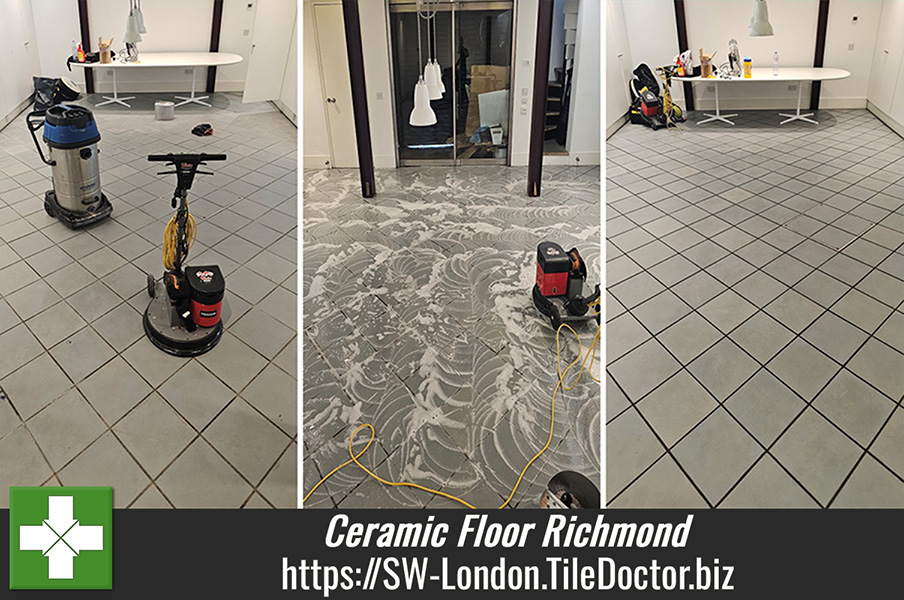
This customer from Richmond called Tile Doctor due to see what could be done to improve the Grout on their Ceramic tiled floor which had been installed throughout the ground floor. Having previously called in a cleaning company to deep clean the tile and grout it now needed remedial work to restore the appearance of the grout. The grout had originally been painted black and this had been badly scrapped by the cleaning company leaving it in a bad state, also he felt the tiles could had not been cleaned properly either.

Having visited the property to survey the floor I was able to reassure the customer that the Grout could be restored and discussed the benefits of the Tile Doctor Grout Colourants. These colourants are made from epoxy and are much more hard wearing than the paint-based product which we usually only recommend for touching up.

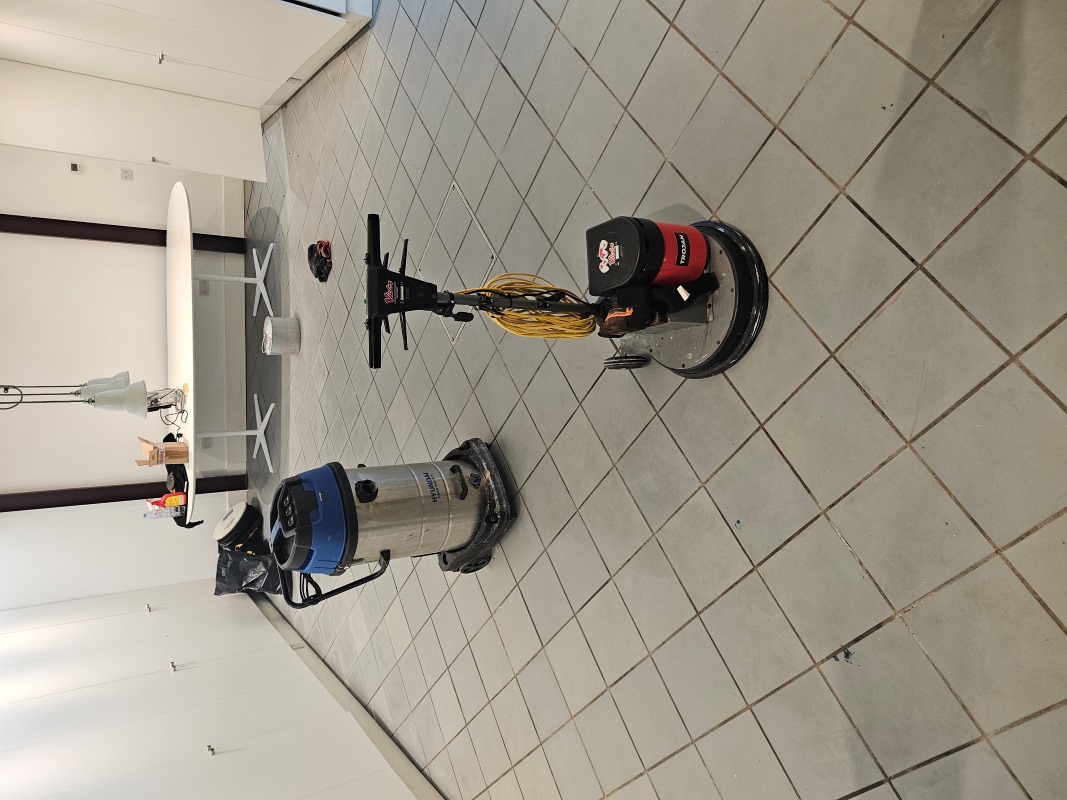
Ceramic Tile and Grout Floor Before Cleaning Richmond Ceramic Tile and Grout Bathroom Floor Before Cleaning Richmond

I worked out a quote for deep cleaning the tiles and colouring the grout with a black colourant to restore the appearance of the floor. After reviewing and answering any questions they quote was accepted and a date scheduled.

Deep Cleaning a Ceramic Floor Tiles

I started off by checking the whole floor for missing grout and then raking out the problem areas and re-filling using a fast-drying black grout.

Attention then turned to deep cleaning the Ceramic floor tiles starting with the application of a medium dilution of Tile Doctor Pro-Clean. This was left mopped onto the floor and then left for ten minutes before being worked into the tiles using a Victor Trojan floor buffer fitted with a Black scrubbing pad. The pad is run over each tile several times moving slowly with small circles to ensure the floor was getting a good scrub and I was getting everything off.

Ceramic Tile and Grout Floor During Cleaning Richmond

There was also a small toilet area to be done which was too small for the Victor machine so and I did this using the same process but with a handheld Dewalt polisher fitted with with a 6-inch black scrubbing pad. Once an area had been scrubbed it was rinsed with water and then all the liquids extracted using an industrial wet vacuum.

Once the floor was cleaned work started on epoxy sealing the grout using Tile Doctor Black epoxy grout colourant, this not only seals the grout but also gives everything a uniformed colour the whole way through. I didn’t need to wire brush and clean the grout on this occasion as the grout had already been cleaned earlier.

In total It took three coats of Black grout colourant to achieve the desired effect and nine hours of hard work on my hands and knees.

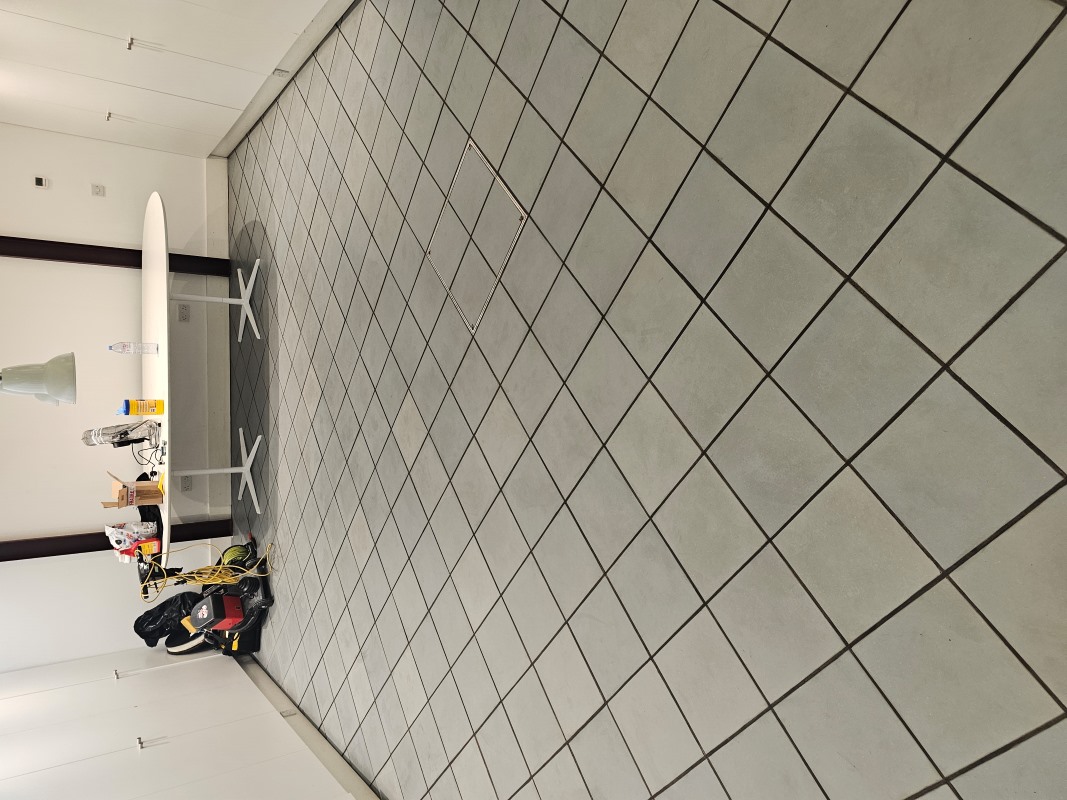
Ceramic Tile and Grout Bathroom Floor After Renovation Richmond Ceramic Tile and Grout Floor After Cleaning Richmond

When finished the Ceramic tiled floor was cleaner, the black grout had been restored and my customer was very happy and requested I return to renovate two bathrooms. For aftercare cleaning I recommended they use Tile Doctor Neutral Cleaner which is a mild yet effective product.


Ceramic Tile and Grout Colour Restoration in South London

Colour Restored to Black Grout on a Ceramic Tiled Floor in Richmond Read More »
Terracotta Tiled Utility Floor Renovation Richmond-upon-Thames

Terracotta Tiled Utility Room Floor Deep Cleaned and Sealed in Richmond

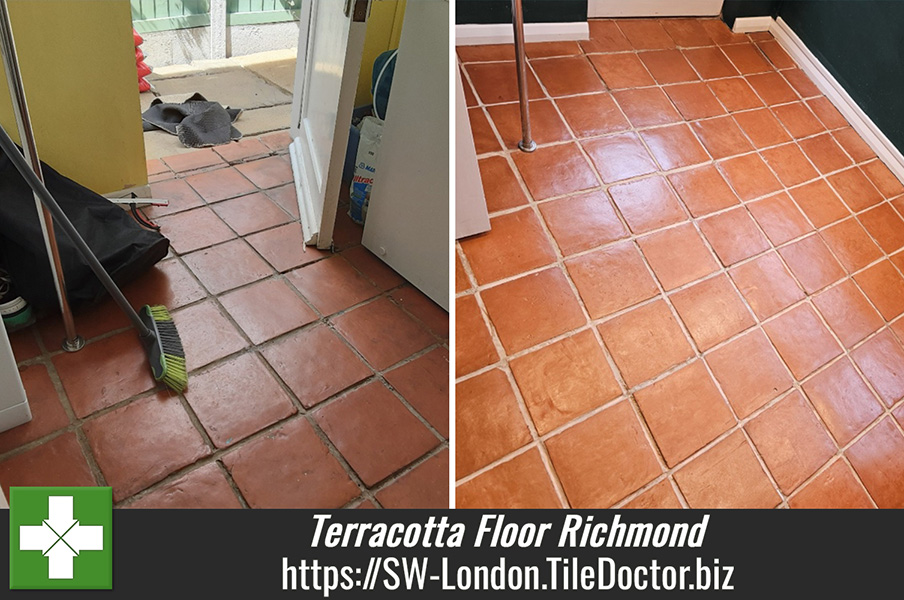
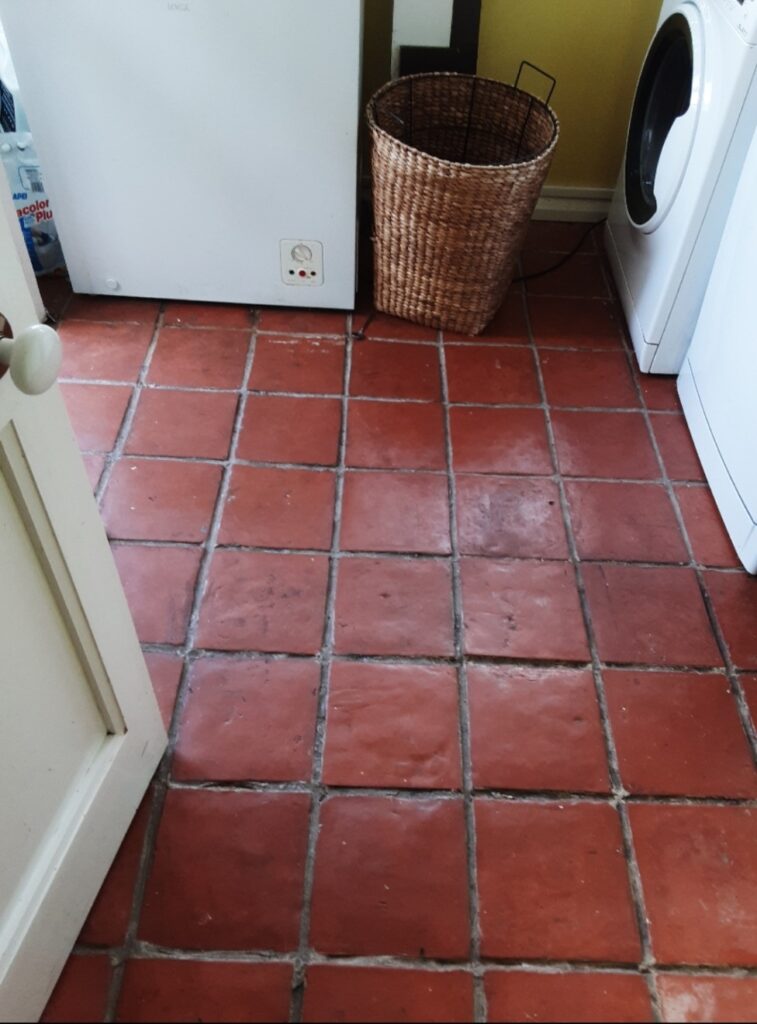
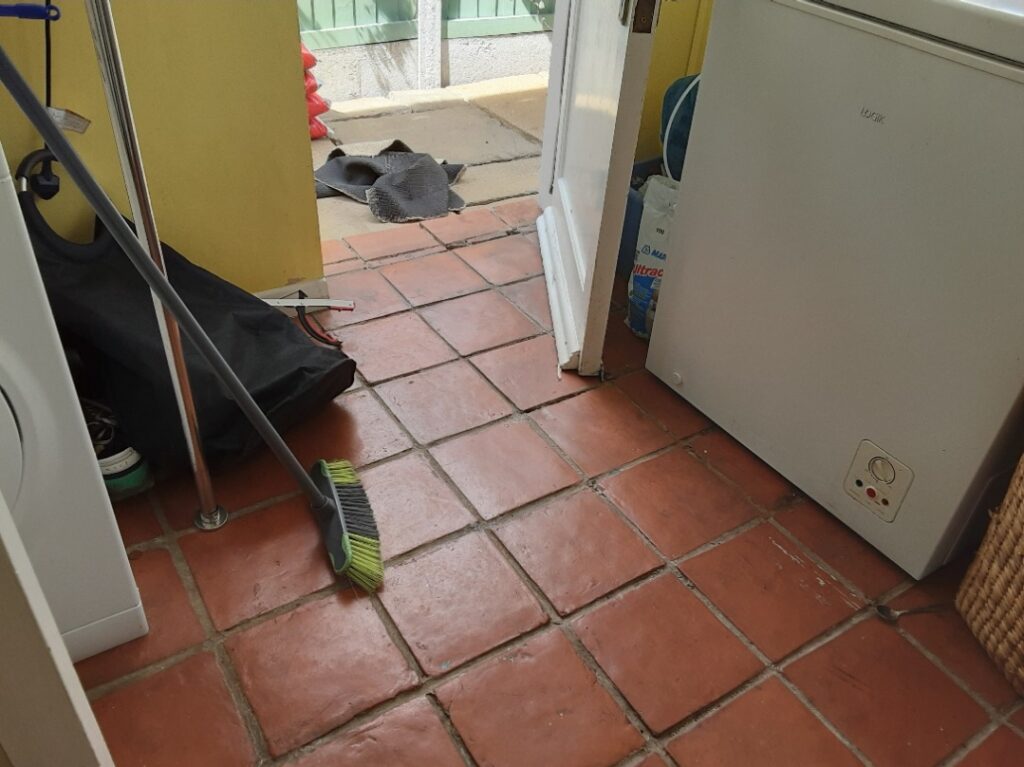
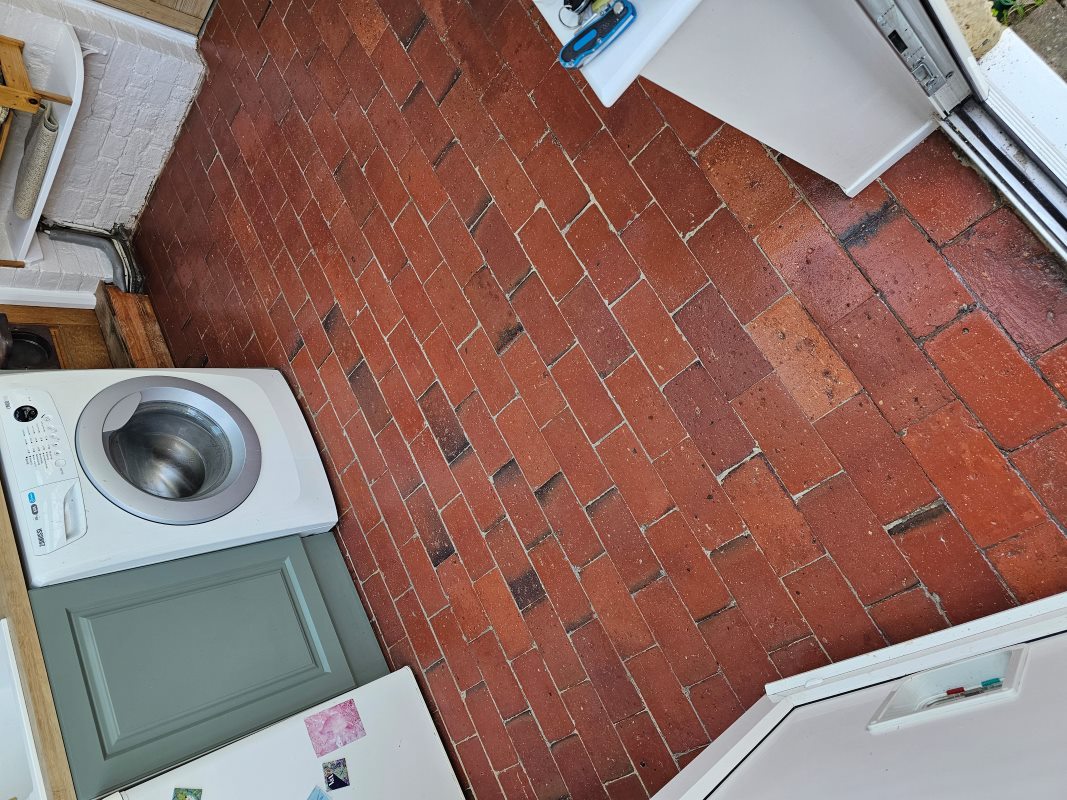
These are terracotta tiles installed 28 years ago in the utility room of a property in Richmond KT2. A new owner moved into the property a year ago and were going to pull the tiles up to replace with vinyl. They assumed the tiles were too far gone for restoration but decided to give me a call first to see if there was anything that could be done.

Terracotta Tiled Utility Floor Before Cleaning Richmond

I visited the property and conducted some tests and established that we could in fact work with the tiles. They were dark with dirt, but I was confident they would come up really well and provided the owners with a quote to deep clean the tiles and then re-seal to protect them.

Terracotta Tiled Utility Floor Before Cleaning Richmond

Deep Cleaning a Terracotta Tiled Utility Floor

The work began by deep cleaning the tiles and removing what was left of the original sealer. It was clear from the start that multiple coats of a protective coating of some kind had been applied and as this broke down with use, dirt had become deeply ingrained into this sealer and not the tile. Deep cleaning of the tiles could only commence once this coating was gone so I started by mopping Tile Doctor Remove and Go stripper diluted with water onto the floor and leaving it to soak in for fifteen minutes. The solution was then agitated with a brush and and the process repeated several times.

It was a small area, so a DeWalt handheld rotary machine fitted with an 80-grit carbide brush was then used to scrub the floor in an attempt to take the sealer off. I soon realised that due to the numerous coats that had been applied the process would need repeating several times. Each application and scrub improving the state of the tiles gradually giving me confidence that I was in fact on the right path.

Once the sealer had been removed, I decided to use Tile Doctor Heavy Build-Up Remover to help with the cleaning process. This was applied to the Terracotta and Grout and then left to soak in for twenty minutes before scrubbing the floor with the Dewalt machine fitted with the carbide brush. The resultant slurry was vacuumed away with a Hyundai wet vacuum. The work was done this way in small sections to ensure the Terracotta was as clean as possible.

Once I was satisfied, the tile and grout was cleaned to its best possible condition the floor was given an acid rinse using Tile Doctor Grout Clean-up. The acid in this product does several things including dissolving any salts that may be in the tiles, further cleaning up the tiles and neutralising the PH level of the floor following the use of alkaline cleaners. After being brushed into the tiles and left for five minutes the solution was removed with the wet vacuum and the floor mopped lightly with clean water.

Terracotta is made of clay, which is very porous, so I decided it was best to leave the floor over the weekend to dry out. This allows for any water vapour to completely evaporate before sealing and allowed time for any remaining salt issues to appear so they could be dealt with before sealing.

Sealing a Terracotta Tiled Utility

On my return, I sealed the floor using Tile Doctor Seal and Go Extra and a paint pad, it took four applications of the sealer before I achieved the correct level and resulted in a fully sealed surface.

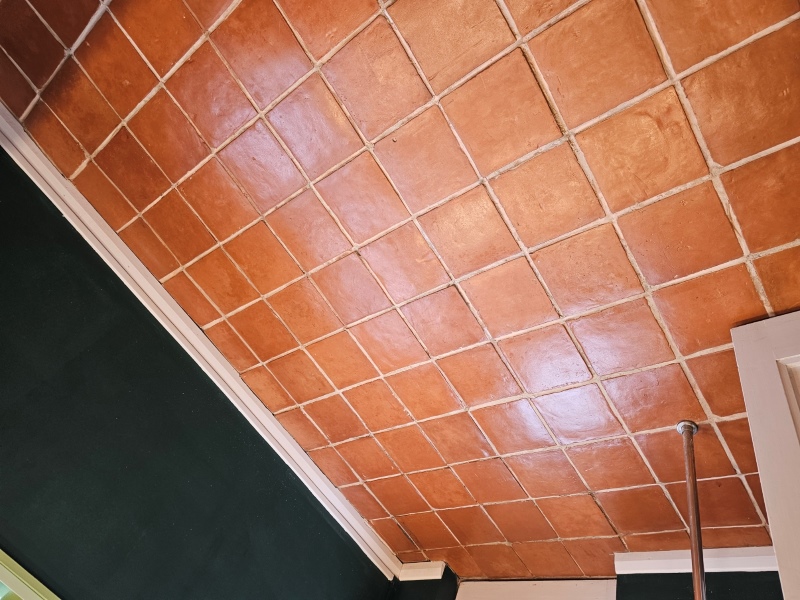
Terracotta Tiled Utility Floor After Renovation Richmond

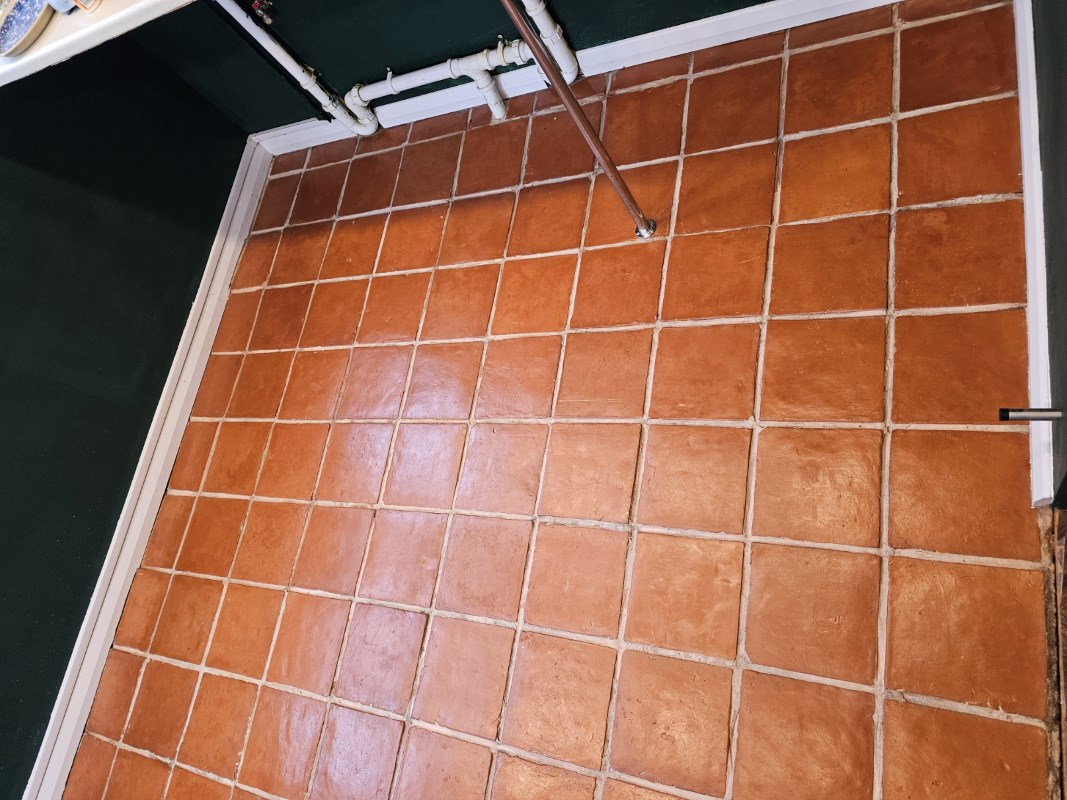
The result was a completely transformed floor; the dark and dirty red colour had gone and was replaced with a fresh orange Terracotta. My client was delighted with the result and left the following feedback:

Daniels standard of work is outstanding. Our tiles came out better than we ever imagined. He arrived on time and was very professional and explained the complete process. He was also very tidy. I would not hesitate to use him again and would thoroughly recommend him.

Terracotta Tiled Utility Floor After Renovation Richmond Terracotta Tiled Utility Floor After Renovation Richmond

Before leaving I took time to explain the importance of using Tile Doctor Neutral Tile Cleaner to maintain the floor going forward. This is a mild but effective Tile and Grout cleaner that won’t impact the sealer.


Professional Restoration of a Terracotta Tiled Utility Floor in Southwest London

Terracotta Tiled Utility Room Floor Deep Cleaned and Sealed in Richmond Read More »
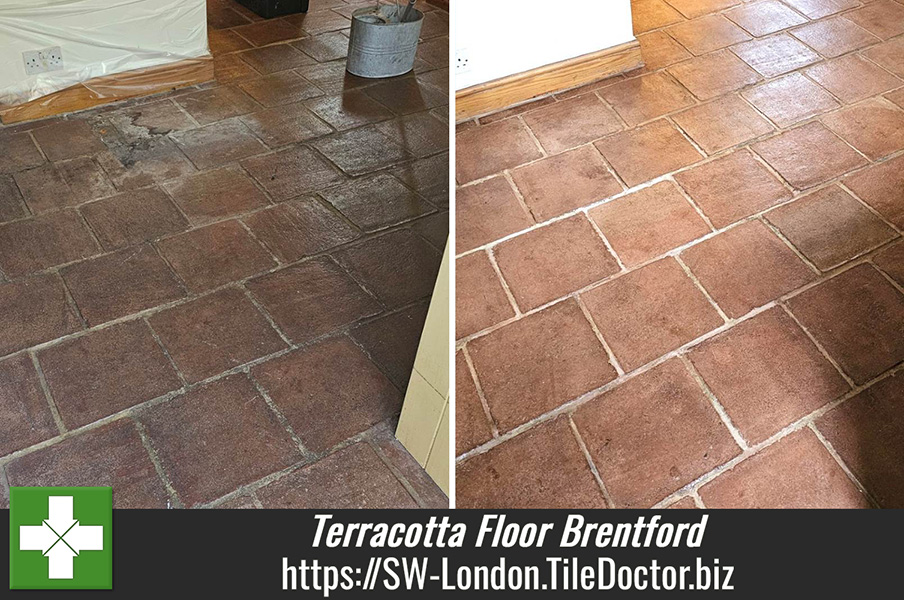
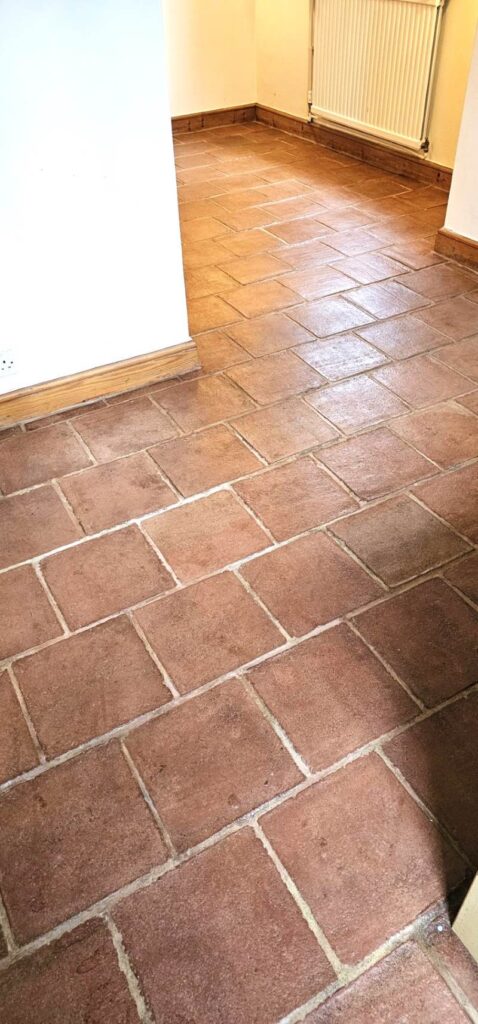
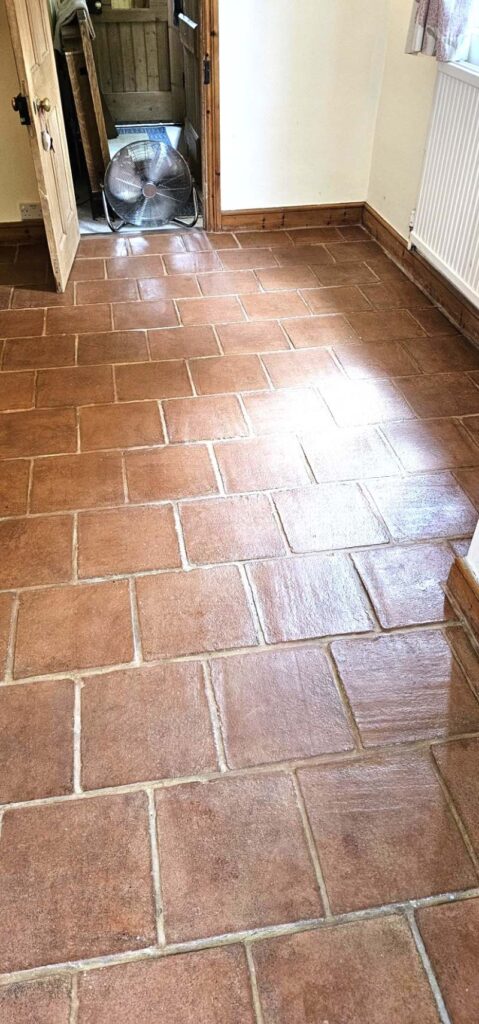
Terracotta Tiled Kitchen Floor Renovation Brentford

Renovating a 27-year-old Terracotta Tiled Kitchen Floor in Brentford

This job is a terracotta tiled kitchen floor at a property in Brentford that was laid 27 years ago and then sealed using wax. Since then, it hasn’t been properly maintained the entire time they have been down and was looking dark and permanently dirty.

Terracotta Tiled Kitchen Floor Before Cleaning Brentford Terracotta Tiled Kitchen Floor Before Cleaning Brentford

Sometimes I can quote for renovating a floor from photos, however, in this case I made sure to book a survey as I could see that the tiles were heavily soiled, as you would expect from 27 years of use with no cleaning. On inspection of the tiles, I could see there was a lot of stripping that needed to happen to remove what was left of the wax.

I explained to the clients the process and the limitations and discovered their expectations for the floor. What the client was looking for was for the tiles to be as clean as possible with a good gloss on the top for easier mopping and maintenance. Once I had this information, I worked out a price and booked the work in.

Cleaning a Terracotta Tiled Kitchen

Once everything was protected, I carried out a damp proof reading on the tiles, noted it down and then applied Tile Doctor Remove and Go stripper to the top of the tiles. I mopped this around for 5 minutes and then agitated with a brush. Once happy it was taking effect, I used coarse carbide brush to scrub the solution in and remove the old sealer. Once complete and the resultant soiling rinsed away and extracted, I was able to inspect the floor and confirm the sealer had been removed.

Happy with stage 1, work progressed to the next step which involved covering the entire floor in a thick layer of Tile Doctor Acid Gel and allowed it to sit for 15 minutes. I did this to prevent too much penetration from the water during the next cleaning phase, but clay tiles like Terracotta react very well to acid during cleaning aiding the whole process. The next step was to use the rotary machine fitted with a black pad and give the tiles a good deep clean. I worked methodically ensuring not to flood the entire floor and again working in sections to allow me to vacuum off the surface water to avoid too much penetration into the tile.

Once happy with this I took a wire brush and cleaned the grout, although it had already mostly been cleaned by the carbide brush on the handheld it allows me to get down and close to the floor so that I can easily spot areas that may have been missed. I then said my goodbyes to the client and went away for 2 days, leaving a fan behind that they moved around to different sections of the floor each day until dry.

Sealing a Terracotta Tiled Kitchen

I stayed in contact with the client leading up to the sealing day and we determined the floor was ready to go. On arrival I took a damp meter reading and after comparing it to the one I took earlier was happy with the result.

Sealing the floor began with the application of Tile Doctor Seal and Go Extra and a paint pad. Four coats of sealer were applied. This is a fully breathable modern acrylic sealer that performs well on Terracotta improving its appearance and adding long lasting protection.

The following day the client called to say that the floor looked a bit dull in places, so I immediately booked them in for the bank holiday Monday and made my way back. On arrival I could see that not all areas of the floor had taken the sealer as well as I thought so I proceeded to apply another 6 coats. Terracotta is a very porous clay-based material and so this is not unusual.

Terracotta Tiled Kitchen Floor After Renovation Brentford

The floor looked even better after this so I’m glad they requested a call back, visiting Terracotta floors more than once can happen, the most important thing is getting the correct results in the end with the least amount of disruption possible.

Terracotta Tiled Kitchen Floor After Renovation Brentford

For aftercare cleaning I recommended the client use Tile Doctor Ph Neutral Cleaner. It’s a mild yet effective floor cleaner that’s safe to use on sealed tiles.


Professional Restoration of a Terracotta Tiled Kitchen in South London

Renovating a 27-year-old Terracotta Tiled Kitchen Floor in Brentford Read More »
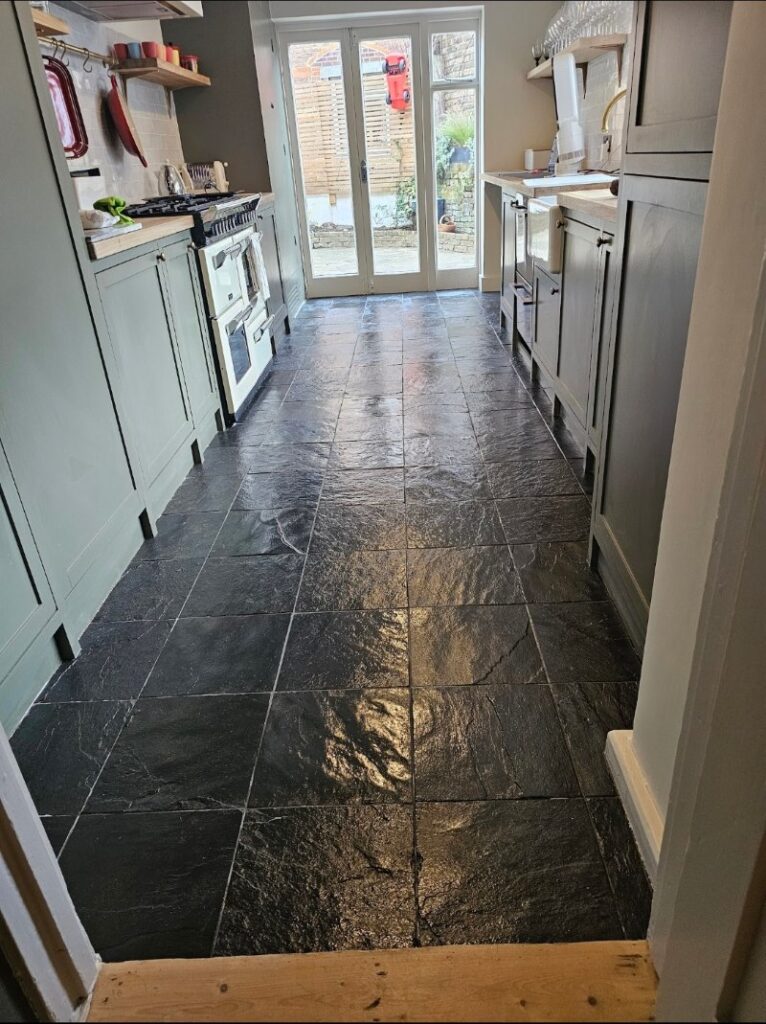
Professional Restoration of Kitchen Quarry Tiles in Twickenham

Neglected Quarry Tile and Grout Professionally Cleaned in Twickenham Kitchen

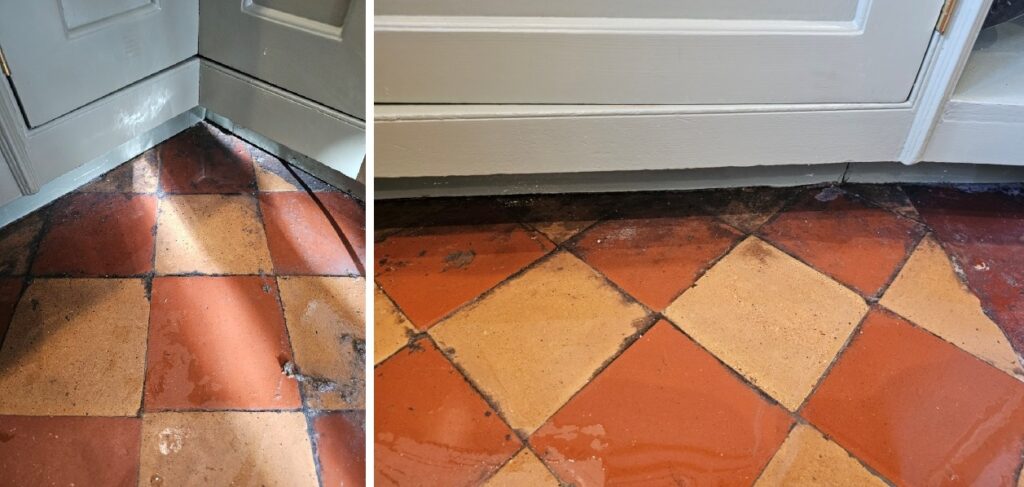
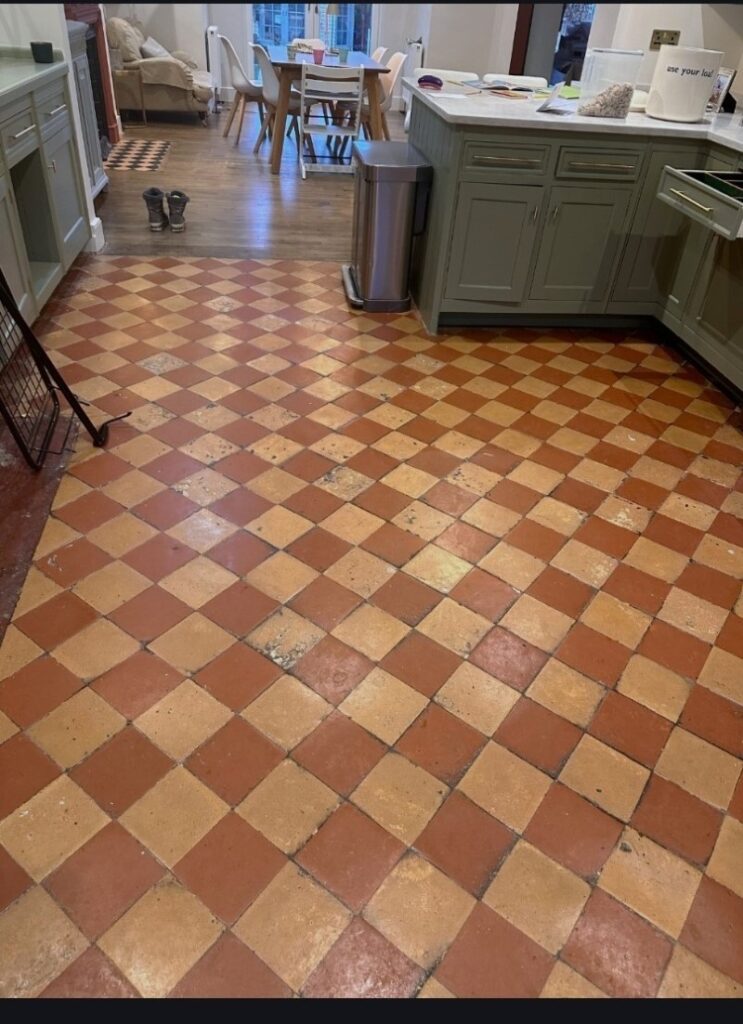
This Quarry tiled floor was installed in the kitchen of a property in Twickenham thirty-eight years prior. The tiles had never been professionally cleaned or sealed since installation and as you can see from the photograph both the tile and grout were in need of restoration.

Quarry Tiled Kitchen Floor Before Professional Tile Cleaning Twickenham

Having visited the property to inspect the floor I recommended giving the tile and grout a deep clean to remove the years of ingrained dirt and then sealing with a breathable sealant that would improve the appearance of the tiles. The main function of the sealer is to prevent dirt from becoming lodged in the porous clay tile, this keeps it on the surface where it can be easily cleaned away. Whilst at the property I also discussed potentially colouring the grout as it was badly stained and may not respond as hoped.

I worked out a quote for the restoration which was accepted and a date agreed for the work to start.

Deep Cleaning a Quarry Tiled Kitchen Floor

The first part of this job was the restoration of the tiles themselves; stained with years of ingrained dirt they needed a deep clean with a strong dilution of Tile Doctor Pro-Clean. For the best results this is sprayed onto the tile and grout and then left to soak in for ten minutes before scrubbing with the black pad fitted to a buffing machine.

The grout was also hand scrubbed at this point with a wire brush and more Pro-Clean, I find the pads can struggle to reach into the recesses of the grout line, so this ensures a better clean. Once done the soiled cleaning solution was then extracted using a wet vacuum.

Next the floor was given an acid rinse with Tile Doctor Grout Clean-Up which was mopped onto the floor and then brushed in. This further cleans up the tiles and removes old grout smears, it also neutralises the floor following the use of Tile Doctor Pro-Clean which is a strong alkaline.

The floor was then given a thorough rinse to remove any trace of product and dried as much as possible with the wet vacuum. Once done the floor was left to dry out for a few days.

Upon my return I noticed that as the floor dried several areas of efflorescence (White salts) had appeared, probably due to the amount of water needed during cleaning. This will have pushed salts up to the surface as the moisture in the tiles evaporated. To resolve this, I gave the floor a further clean with a weak solution of Tile Doctor Grout Clean-up which being an acidic dissolved the salts.

Applying White Grout Colourant to a Quarry Tiled Kitchen Floor

The floor was then inspected, and it was agreed that although the grout lines were much cleaner than before they were still stained in places, and this was bringing down the overall appearance of the tiles. So, it was decided to implement my contingency plan and colour the grout using a Tile Doctor Grout Colourant in White.

Quarry Tiled Kitchen Floor During Grout Colouring Twickenham

The colourant is painted onto the grout any excess is wiped off the adjacent tile as you progress. It doesn’t take long to apply however there were a lot of grout lines to cover due to the small size of the tiles.

Sealing a Quarry Tiled Kitchen Floor

With the cleaning complete and the grout issues resolved it was time to move onto the final part of the floor restoration by sealing the tiles. Having discussed the required finish earlier the customer had chosen Tile Doctor Seal and Go Extra for this. This product provides a lovely low sheen finish and due to the porosity of the clay Quarry tiles it took seven coats before the floor was fully sealed.

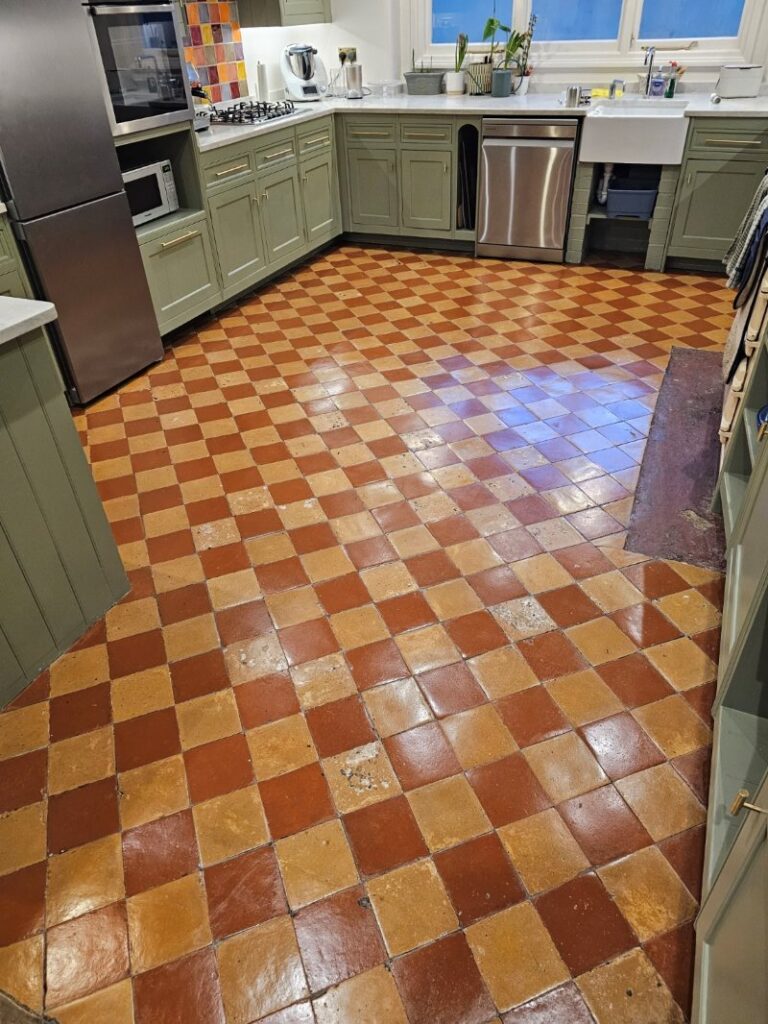
Once complete the work really lifted the appearance of the quarry tiles which were more colourful and brighter. Also, the new sealer along with the protection provided by the Grout Colourant will make maintenance cleaning much easier.

Overall, the floor came out well and my client was very happy, leaving positive feedback and more work booked in for a later date.

Quarry Tiled Kitchen Floor After Professional Tile Cleaning Twickenham

Before leaving I recommended, they use Tile Doctor Neutral Tile Cleaner for cleaning going forward, this product is safe to use on sealed tiles and won’t harm the sealer.


Professional Restoration of a Quarry Tiled Kitchen in Southwest London

Neglected Quarry Tile and Grout Professionally Cleaned in Twickenham Kitchen Read More »
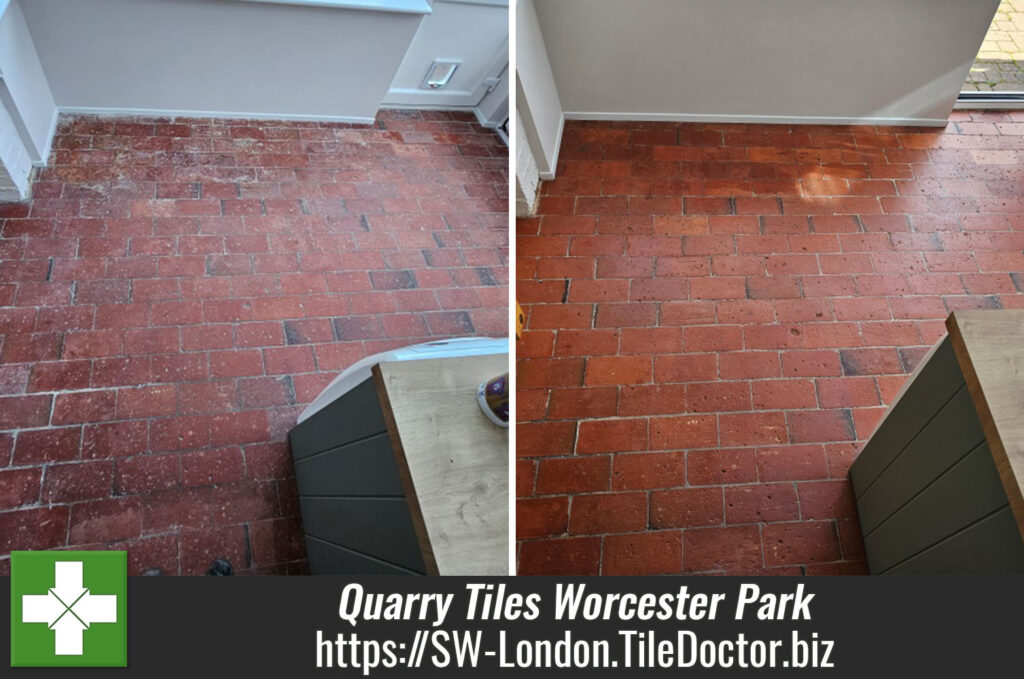
Black Slate Kitchen Floor Renovation Richmond London

Cleaning and Sealing a Black Slate Kitchen Floor in Richmond KT2

This is a black slate floor in Richmond that had been stripped of its natural oils and sealer due to the client using a steam mop repeatedly over the years. The floor also had missing grout that needed replacing before cleaning could commence.

Black Slate Floor Before Cleaning Richmond KT2

The flat wasn’t on the ground floor so there was a concern that the missing grout may result in water getting under the tile causing damage to the floor and not to mention the ceiling of the property below.

Repairing Grout and Cleaning a Black Slate Tiled Kitchen Floor

The first thing I did was to protect all the Kitchen units by covering them in a drop cloth. Once that was done work started on the grout lines which involved raking out the loose grout and replacing with a fast-setting grout in matching grey.

Once the grout had set attention moved onto to cleaning the Black Slate tiles which without the protection of a sealer contained a lot of ingrained dirt. To clean the tiles a medium strength dilution of Tile Doctor Pro-Clean was sprayed onto the floor and left to soak in for ten minutes. The floor was then scrubbed with a carbide brush fitted to a handheld De Walt polishing machine, I then used a Hyundai wet vacuum to hoover up the water and sediment that had come up during cleaning.

Next, I scrubbed the grout with a mixture of Tile Doctor Pro-Clean, water and a wire brush. To finish I gave the tiles a light acid wash using Tile Doctor Grout Clean-Up diluted with water. I vacuumed this off, washed the tiles down with water and gave it a final vacuum to get it as dry as possible.

Black Slate Floor After Cleaning Richmond KT2

The floor was then left to dry out, leaving a floor dryer with the client to run for a few hours more before turning off and leaving the floor overnight.

Sealing a Black Slate Tiled Kitchen in Richmond-Upon-Thames

On my return, after establishing the stone had completely dried out, I applied two coats of Tile Doctor X-Tra Seal. The sealer was worked into the floor with a cloth using small amounts at a time polishing off the excess as I went along. It’s important to do this with this sealer otherwise it can get slightly tacky if too much is left on the surface.

Tile Doctor Xtra Seal was chosen for this floor as it’s an oil-based sealer and that add structure to the stone and works well to bring out its features and colour. It’s also extremely durable and leaves a nice low satin finish.

Black Slate Floor After Renovation Richmond KT2

The floor was transformed by the work and my client was extremely pleased with the result. For aftercare I recommended the use if Tile Doctor Neutral Tile Cleaner, it has a pH neutral formula that won’t impact the newly applied sealer. Typical household cleaning products tend to be bleach based and will strip off the sealer protecting the stone from ingrained dirt and so best avoided.


Professional Renovation of a Black Slate Tiled Kitchen in South London

Cleaning and Sealing a Black Slate Kitchen Floor in Richmond KT2 Read More »
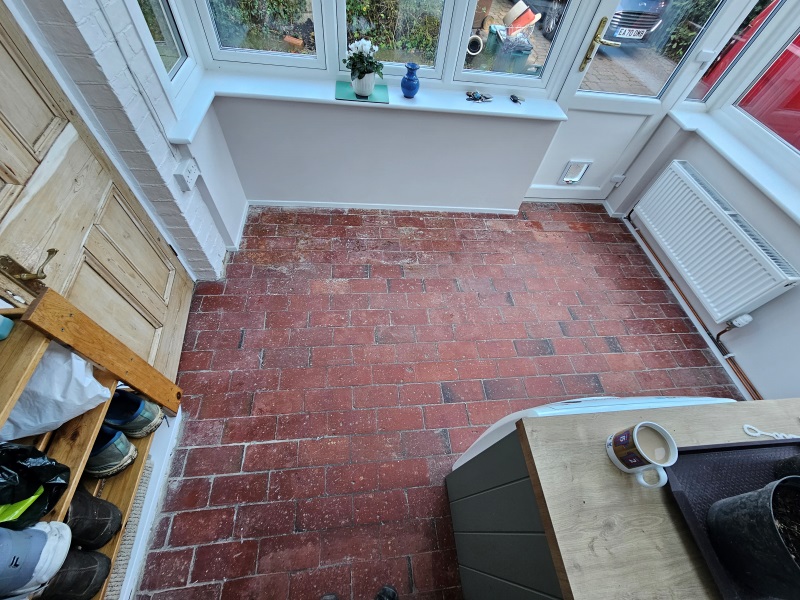
Quarry Tiled Kitchen Floor Renovation Worcester Park

Renovating a Quarry Tiled Kitchen Floor in Worcester Park

I was asked to renovate a Quarry tiled floor in the Kitchen of an older property in the South London suburb of Worcester Park . I was informed the Quarry tiled floor was in fact 130 years old Quarry floor and had not been professionally cleaned for 45 years.

I went over to the property to survey the tiles and could see the tile and grouting had experienced a lot of staining over the years. The floor had layers of old sealer, which I suspect was a wax-based product, as well as paint, adhesives and cement. All of which would need to be removed

Quarry Tiled Kitchen Floor Before Renovation Worcester Park

I worked out a quote that would involve stripping the floor, deep cleaning the tiles and then re-sealing with a modern sealer. The client was happy with my quote, and so we scheduled a date for the work to start.

Deep Cleaning and Restoring a Quarry and Quarry Tiled Floor

To strip the floor of old sealers etc. I applied a strong dilution of Tile Doctor Remove and Go and left it to soak into the Quarry tiles for a good ten to fifteen minutes. The solution was then worked in with a Carbide Brush fitted to a weighted rotary floor buffer. The resultant slurry was rinsed away and then extracted with a wet vacuum. The floor was then inspected and repeated with stubborn areas spot treated with hand tools until I was happy all the old sealer was gone.

The grout lines also need attention so these were scrubbing by hand using Tile Doctor Pro-Clean and a wire brush. I find this is the best way to clean grout as pads can struggle to reach into the recesses of the grout. Some of the grout was badly stained however so short of replacing it the best I could do was to get it as clean as possible. Once done I rinsed the floor with water again and extracted the soiling with a wet vacuum as before.

Last step in the cleaning process was to treat the floor to an acid rinse using a medium dilution of Tile Doctor Grout-Clean-up. This is an acidic product that will dissolve old grout smears, efflorescence and other mineral deposits left of the tiles, it also neutralises the pH level of the floor following the use of Remove and Go which is a strong alkaline. The product is brushed into the tiles and then removed as before with more water and a wet vacuum.

After a final rinse the floor was dried as much as possible using the wet vacuum and left to dry off overnight.

Sealing a Quarry Tiled Barn Conversion Floor

Returning the next I started by taking several readings with a damp meter. It’s not a good idea to apply a sealer to a damp floor as the results can be inconsistent so I always like to check. The readings were within tolerance so I was able to apply the first of what would be six coats of Tile Doctor’s Seal and Go Extra which I felt was the best choice for sealing this floor. The floor looked patchy for a while and I was slightly concerned however the sealer eventually filled the tiles up and was left with a nice finish.

I chose Seal and Go Extra because it’s a fully breathable sealer that adds a nice subtle sheen to the tiles which matches the customers’ expectations. It was important to choose a breathable sealer as these old floors don’t have the benefit of a damp proof membrane and any moisture under the floor will be able to rise through the tile and evaporate at the surface un-hindered.

Quarry Tiled Kitchen Floor After Renovation Worcester Park

Once completed, the floor looked fantastic, not only was the Quarry Tile and Grout looking so much cleaner the sealer had enhanced the orange colour in the Quarry tiles. Needless to say, my customer was very happy with the result.

For aftercare I recommended Tile Doctor Neutral Tile Cleaner which is designed for the safe and effective cleaning of sealed floors without impacting the sealer.

Quarry Tiled Kitchen Floor After Renovation Worcester Park


Professional Cleaning of a Quarry Tiled Floor in South London

Renovating a Quarry Tiled Kitchen Floor in Worcester Park Read More »
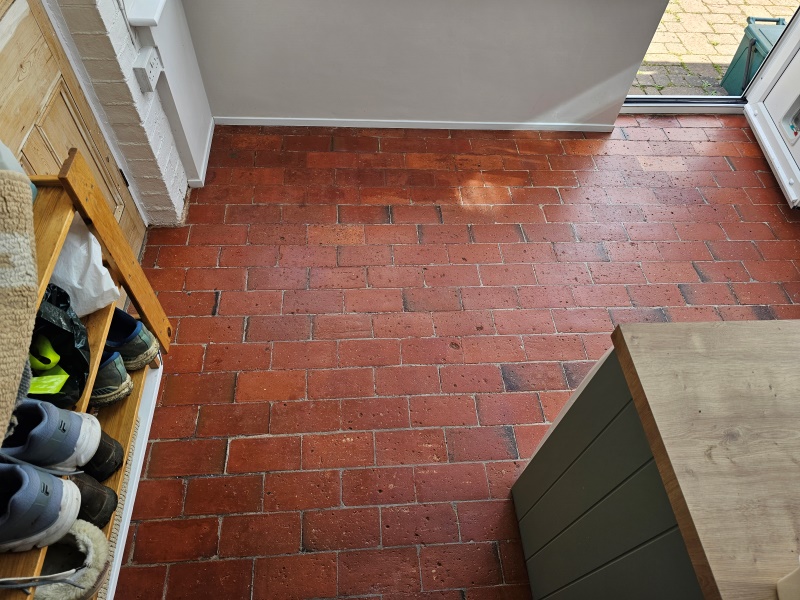
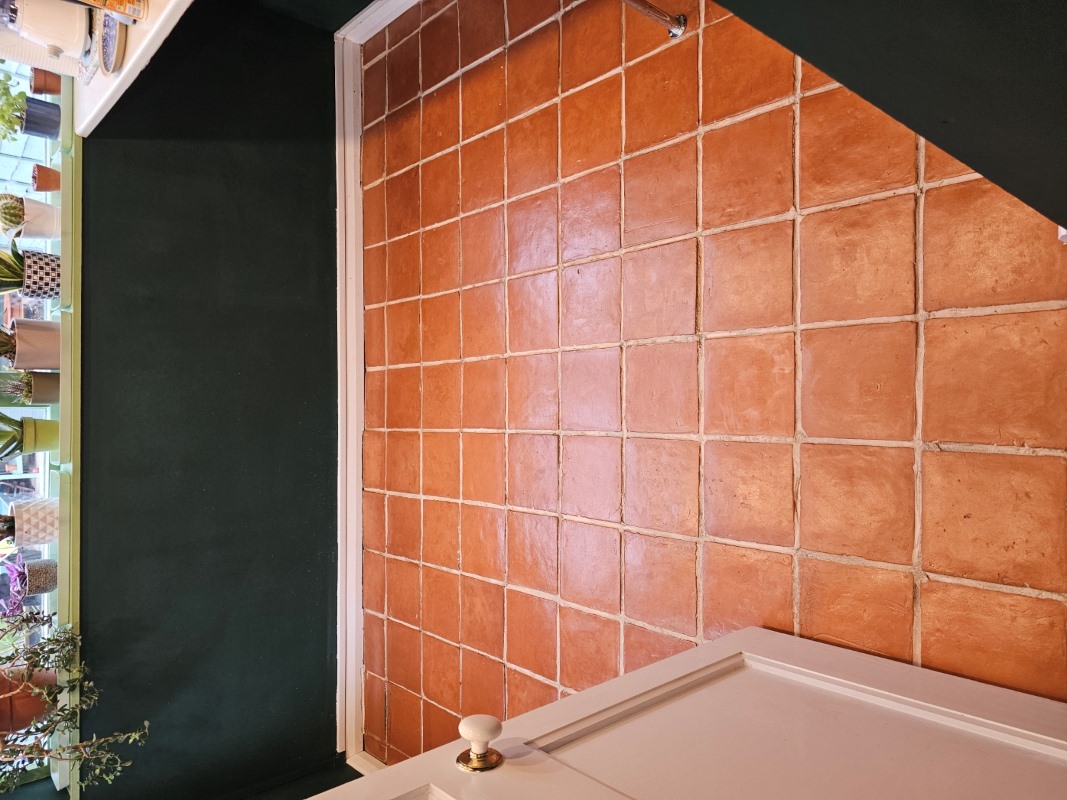
Terracotta Tiled Kitchen Floor Renovation Richmond

Deep Cleaning a Filthy Terracotta Tiled floor in Richmond

This Orange and Red Terracotta tiled floor at property near Richmond was absolutely filthy and proved to be a real challenge to get clean. It clearly hadn’t been professionally cleaned for some time and when I went to do the survey, I could see a build-up of grease and old sealer throughout.

Due to its porosity Terracotta is particularly vulnerable and to keep its appearance the sealer needs to be maintained correctly as it will wear in the busiest areas with use. In this case I was able to re-assure the homeowner that I would be able to strip off all the old layers of sealer, deep clean the tiles and re-seal to leave it looking like a new floor.

Terracotta Tiled Kitchen Floor Before Cleaning Richmond

Happy with my quote I got the go-ahead and we agreed a date to start the work which should take two days, one to strip and clean and the other to seal.

Removing Sealer and Cleaning a Terracotta Tiled Kitchen Floor

To strip the sealer off the Terracotta floor I applied a strong dilution of Tile Doctor Remove and Go which is a powerful alkaline coatings remover that’s safe to use on Tile and Stone. The solution was sprayed on to the kitchen floor and then left to soak in for fifteen minutes to give it time to break down the sealer and soils.

I then inspected the floor and could see a lot more work would be needed to get it completely free of old sealer and dirt. As a result, there was nothing for it but to get down on my knees scrapping everything off the tiles with more Remove and Go. I found most of the old sealer and grease just flaked off but some areas were difficult. I had some assistance from a DeWalt handheld buffing machine fitted with a stiff brush but it was still very hard work, especially around the edges of the kitchen as my hands barely fit underneath the units.

After about six hours I was satisfied everything was removed and I could turn my attention to the grout. For this I hand scrubbed the grout lines using a strong dilution of Tile Doctor Pro-Clean rinsing and extracting as I went.

Terracotta Tiled Kitchen Floor During Renovation Richmond

Last step in the cleaning process was to treat the tiles to an acid wash which will further clean the tiles and equalise the floors pH level after the use of alkaline cleaners earlier. I used Tile Doctor Grout Clean-Up for this which was first scrubbed in, then rinsed with water and extracted as before. The floor was rinsed down again two more times with water to remove any trace of product. I used the wet vacuum used to extract as much moisture from the floor as possible so it can have a better chance of drying out overnight.

Sealing a Terracotta Tiled Kitchen Floor

When I called back seal the Terracotta, I first checked the moisture readings in several areas with a damp meter to verify the floor was nice and dry. All was well so several coats of a Tile Doctor Seal and Go Extra were applied to the floor allowing forty minutes drying time between coats.

The new sealer left the now clean Terracotta tiles with an attractive mid satin finish and
looked fantastic and was doubly improved by the grout cleaning which had responded well to the Pro-Clean. The customer was very pleased with the transformation in their floor which now looked clean and bright.

Terracotta Tiled Kitchen Floor After Renovation Richmond

Before leaving we left the customer with a bottle of Tile Doctor Neutral cleaner for aftercare. To get the best from their Terracotta tiles it’s important that customers use the correct product for regular maintenance cleaning from the start, stronger products will reduce the life of the sealer.


Professional Clean and Seal of a Mexican Terracotta Tiled Kitchen in South London

Deep Cleaning a Filthy Terracotta Tiled floor in Richmond Read More »
Bathroom Floor Grout Restoration in Tooting SW17

Bathroom Floor Tile Grout Restoration in Tooting SW17

A client was renovating a house in Tooting and wanted to see what could be done to improve the Ceramic floor tiles in the bathroom without the expense of a major overhaul. Having discussed the floor over the phone I was confident it could be improved and agreed a date to come over and survey the tiles and provided a quote for their renovation.

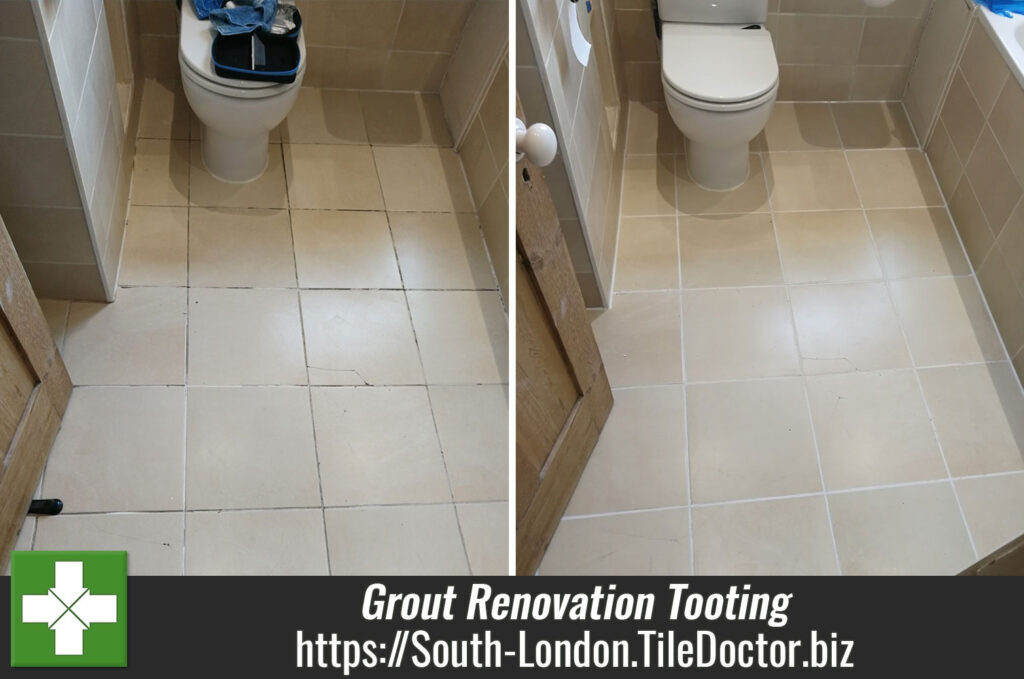
Bathroom Floor Grout Before Restoration in Tooting SW17

Except for one cracked tile, the tiles were in good condition and I could see it was really the grout that was bringing the bathroom down. The grout was generally discoloured and some had cracked and become loose. This cracking issue is indicative of using an inflexible grout when tiling on a wooden floor as these floors tend to have a bit of movement in them.

I discussed my renovation plan with the customer and provided a quote for carrying out the work which was accepted.

Renovating Bathroom Floor Grout

On the first day I set about raking out the cracked grout and stripping out the silicone between the tile and the bath. Silicone seems to attract mould and although it can be cleaned to some extent, I usually find its more effective to simply replace it. I then tidied up the bathroom to remove the waste grout and silicone, so the area was ready for grouting. I used a flexible White grout for this in order to match the original, although most of that was no longer White due to the staining.

I left the grout to set overnight and returned the next day to complete the job starting with the re-application of the silicone sealant, again in White but this time using an anti-mould variety. My attention then turned to the floor tile grouting which of course was now a mixture of fresh new grout and stained grout. I had realised this would be the result, so I had come prepared and was ready to apply Tile Doctor Grout Colourant in white to make everything uniform.

Before applying the colourant, I prepped the grout joint with Tile Doctor Pre-treat cleaner that is an acidic cleaning solution that is sprayed onto the grout and then scrubbed in. This cleans the grout joints, and the acidic nature of the cleaner helps prepare the grout to achieve a better bond with the colourant. The grout was then wiped with a wet sponge to remove the dirt and then dried ready for the colourant. Although the cleaner had helped to clean the grout and remove surface dirt it can’t do anything about deep seated staining, so colouring was still necessary.

Once the grout was dry the White grout colourant was painted onto the grout using a small brush wiping off any excess from the tile as I went. The Tile Doctor range of Grout Colourants come in eleven different colours and form an epoxy barrier over the grout preventing dirt from reaching the grout line and making it much easier to keep clean.

Bathroom Floor Grout After Restoration in Tooting SW17

Once the colourant had dried, I gave the floor a quick clean with Tile Doctor Neutral Tile Cleaner to get the ceramic tiles clean and the job was complete. The refreshed grout now has a consistent white appearance, and it really lifted the appearance of the bathroom.


Professional Restoration of a Bathroom Floor Grout in South London

Bathroom Floor Tile Grout Restoration in Tooting SW17 Read More »
Scroll to Top