london

Bathroom Floor Grout Revamp Isleworth

Grout Revamp of a Ceramic Tiled Bathroom Floor in Isleworth

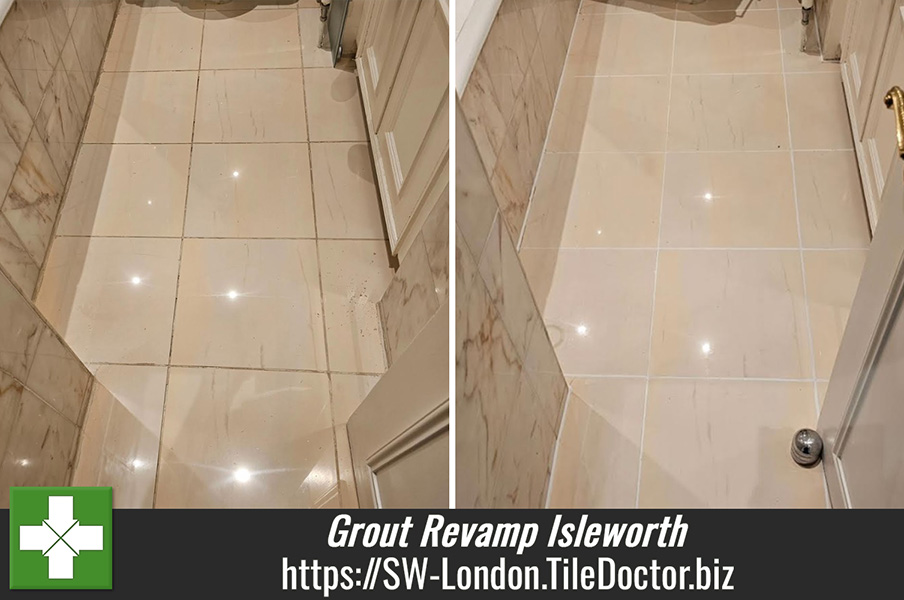
The Grout on this bathroom floor at a property in Isleworth was in quite a state and was bringing down the overall look of the bathroom. Ceramic tiles are impermeable so very easy to clean so although I would include giving them a thorough clean, I knew it was the grout that would be the most work.

Bathroom Floor Grout Before Restoration Isleworth

After taking a look, I realised that the staining was so deep cleaning wouldn’t give a consistent look so immediately recommended colouring the grout and replacing the tired silicone sealant all of which could be done in a day. Happy with my suggestion I worked out a quote which was accepted and a date agreed.

Deep Cleaning Grout on a Ceramic Tiled Floor

To start the grout was given a scrub using pre-treat cleaner, it’s comes in a spray bottle so it’s very easy to apply. It’s an effective ready-to-use cleaner designed to clean and lightly etch the grout to achieve a superior bond with the colourant which would come next.

As part of the cleaning, I also gave the ceramic tiles a light scrub with Tile Doctor Pro-Clean which is an alkaline Tile and Grout cleaning solution. The bathroom floor was a small area so this work was carried out by hand using a scrubbing brush. Once done the floor was rinsed with water and the soiling extracted with a wet vacuum until as dry as possible.

The next step was to strip out the silicone sealant between the tile and verticals; this is done using a sharp knife until all the remnants of silicone are removed. With that completed work moved on to colouring using a bottle of Tile Doctor Grout Colourant in White. The colourant is painted onto the grout line using a small brush and any excess wiped off the tile afterwards. Two coats of colourant were needed to achieve a consistent appearance.

To finish fresh anti-mould silicone sealant in White was applied between the floor tiles and vertical surfaces.

Bathroom Floor Grout After Restoration Isleworth

Once complete the bathroom looked fresh and crisp giving the impression of a new installation. For aftercare cleaning I like to recommend Tile Doctor Neutral Tile Cleaner along with a two-chamber mop and bucket that can keep clean and dirty water separate.


Professional Cleaning of Ceramic Tile and Grout in South London

Grout Revamp of a Ceramic Tiled Bathroom Floor in Isleworth Read More »

Victorian Tiled Lobby Floor Cleaned and Sealed Richmond

Victorian Tiled Lobby Floor Renovated at Richmond Apartment Block

Pictured below is a large Victorian tiled floor in the lobby area of a residential apartment block in Richmond. Building work had been carried out at the property and the contractors had covered the floor using a used a sticky floor protector. Unfortunately, that left a sticky residue on top of the tiles and were overdue a professional deep clean. The floor was cleaned every day for the last eight years but this was done using a mop which isn’t the most effective method.

Victorian Tiled Lobby Floor Before Cleaning Richmond

I paid a visit to the property to work out the best product to remove the adhesive and measure up. From this I worked out a detailed quote for renovating the floor which included two days labour and all the products needed. This was accepted and a date scheduled.

Victorian Tiled Lobby Floor Before Cleaning Richmond

Cleaning a Victorian Tiled Hallway Floor

The hallway was in use by the residents whilst I was there so I had to carry out the following work in sections. To remove the adhesive and give the floor a deep clean the tiles were cleaned with the application of Acid Gel. Being a gel it’s much easier to control and with less water being needed it results in quicker drying times.

The gel was applied and let to soak in for fifteen minutes to give it time to digest the dirt etc, then the floor was lightly moped and I got to work with a scraper to remove as much sticky residue as possible. More Acid Gel was applied and then scrubbed into the tiles using a Victor Trojan buffing machine fitted with a 400-grit burnishing pad and extra weights. The machine was moved slowly across the tiles ensuring all areas where covered.

Victorian Tiled Lobby Floor During Cleaning Richmond

After completing a small section, the soiling was rinsed and extracted using an industrial wet vacuum. Vacuuming this frequently ensures the fluids had less time to soak into the tile and results in a faster drying time.

Once I had worked my way to the end the floor was vacuumed again and more Acid Gel was applied, this was diluted with a small amount of water and the deep cleaning continued with an 800-grit burnishing pad. As before after each section the floor was rinsed and the soiling immediately extracted with the wet vacuum. Once I was satisfied the floor was in a good condition it was given a final burnishing using a finer 1500-grit pad applied with water and then vacuumed one last time.

Once complete the tiles were clear of the sticky residue and looking very clean indeed. It needed to be completely dry before the next step of sealing so work finished for the day and the tiles were left to dry off completely overnight. It’s important to do this and allow time for all the moisture to evaporate, this way any issues like efflorescent salts will become apparent and resolved.

Sealing a Victorian Tiled Hallway Floor

I returned later the second day to seal the floor starting with several damp meter readings and a quick check of the tiles. Being a communal hallway I wanted to ensure they were still clean from the day before and any marks were spot cleaned.

The floor was then sealed with Tile Doctor Colour Grow which is a colour enhancing hard wearing impregnating sealer that leaves a matt finish and deepens the colour of the black tiles. Three coats were applied using a microfiber cloth and then any excess was buffed with a clean cloth after each application.

Victorian Tiled Lobby Floor After Cleaning Sealing Richmond

Once satisfied I called the managing agent to have a look and they reported that they were extremely happy with the result. In fact, they have since requested that I return every month to maintain the floor correctly and ensure it remains in top condition.


Professional Renovation of a Victorian Tiled Lobby Floor in Southwest London

Victorian Tiled Lobby Floor Renovated at Richmond Apartment Block Read More »

Limestone Tiled Shower Cubicle Renovation Isleworth

Stained Limestone Tiled Shower Cubicle Renovated at Isleworth Rental

Here we have a Limestone tiled shower cubicle with fifteen years of chemical damage and general grime at a rental property in the Hounslow borough of Isleworth. It had never been professionally cleaned since installation and previous tenants had used Viakal limescale remover.

Limestone Tiled Shower Cubicle Before Renovation Isleworth

Limescale removers like Viakal are acidic with a low pH and will etch natural stone such as Limestone so definitely not recommended. The product states to avoid use on natural stone on the label, which in this case was ignored.

Fortunately, there is a solution however it involves using various grades of diamond burnishing pads to cut back the stone to remove the damage and restore its appearance. I worked out a quote for renovating the stone and cleaning the grout which was equally stained. Happy to have found a solution and keen to have the shower cubicle ready for the next tenant I was asked to go ahead,

Shower Tile and Grout Cleaning

I started off by cleaning the grout with a wire brush and Tile Doctor Pro-Clean. Unfortunately, the grout was so bad it couldn’t get it consistently clean so decided to apply a grout colourant on it later.

Next attention turned to resurfacing the Limestone starting with the application of a 400-grit 6-inch pad fitted to a DeWalt machine. The pads are applied with water for lubrication and are designed to resurface the stone to remove the etching. I very quickly realised however the 400-grit wasn’t having the desired effect so I dropped down to a 200-grit pad, this also didn’t work so I went down to a 100-grit. This did the job and the Limestone started to show improvement.

The 100-grit pad was then run across the all the effected Limestone again using water for lubrication. Once done the tiles were rinsed with water to remove and the pad switched for a 200-grit. This process was then repeated working through increasingly finer pads of 400, 800 and then finally 1500-grit.

Once the whole shower was burnished in this was the remaining water was vacuumed away with a Hyundai wet vac and the shower left to dry with a fan in place. When I came back, I checked the results of the burnishing and realised there were still visible marks on some of the Limestone tiles and so repeated the process starting with the 400-grit pad and up; eventually after around 6-7 hours I had the desired finish.

Sealing Limestone Shower Tiles

A lot of water was used during the burnishing so I left the shower to dry overnight and added the finishing touches the following day. This included cutting out the silicone sealant and sealing the stone with Tile Doctor Ultra-Seal. I wanted to keep the stone light so decided against using a colour enhancer.

After allowing two hours for drying the last steps were to colour the grout using one of Tile Doctor’s Grout Colourants in a Limestone colour and then apply fresh silicone mastic around the edges.

Limestone Tiled Shower Cubicle After Renovation Isleworth

This was the hardest job I’ve done so far but the result was worth it. The shower cubicle looked like a new installation and my customer was very happy with the result; they had very low expectations and this far surpassed them.


Professional Stone Tiled Wet Room Renovation in Berkshire

Stained Limestone Tiled Shower Cubicle Renovated at Isleworth Rental Read More »

Dull Marble Kitchen Countertop Polishing Surbiton

Restoring the Polish to a Marble Kitchen Countertop in Surbiton

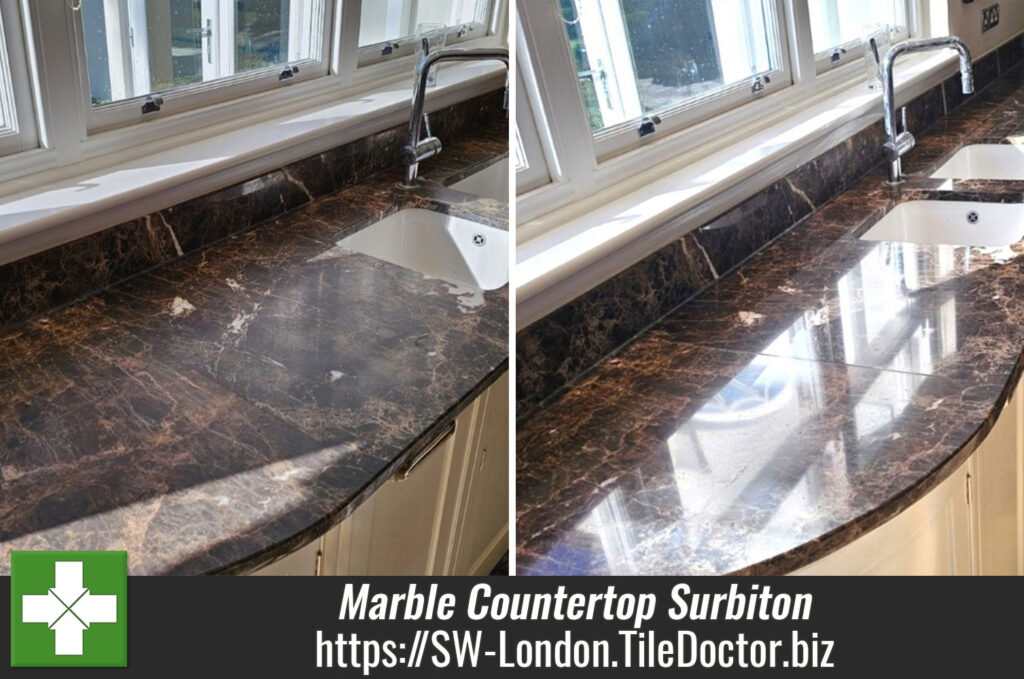
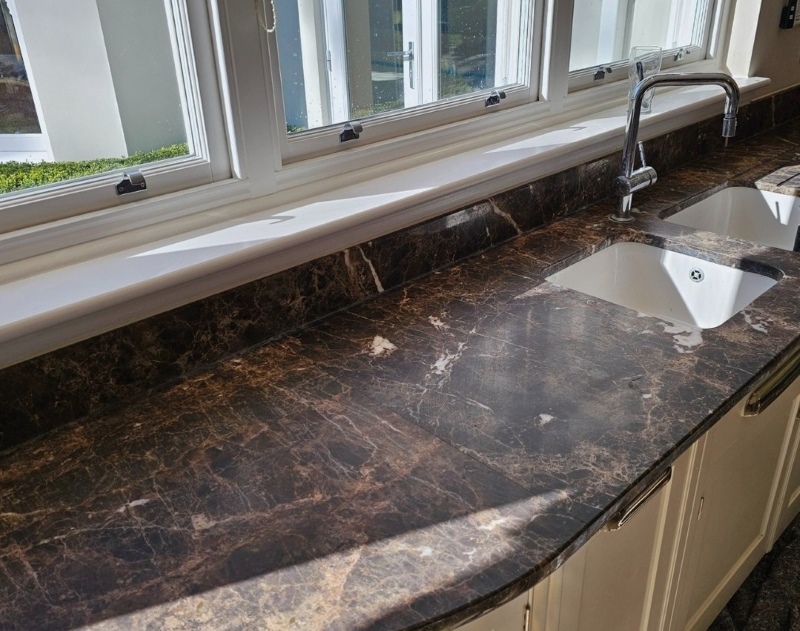
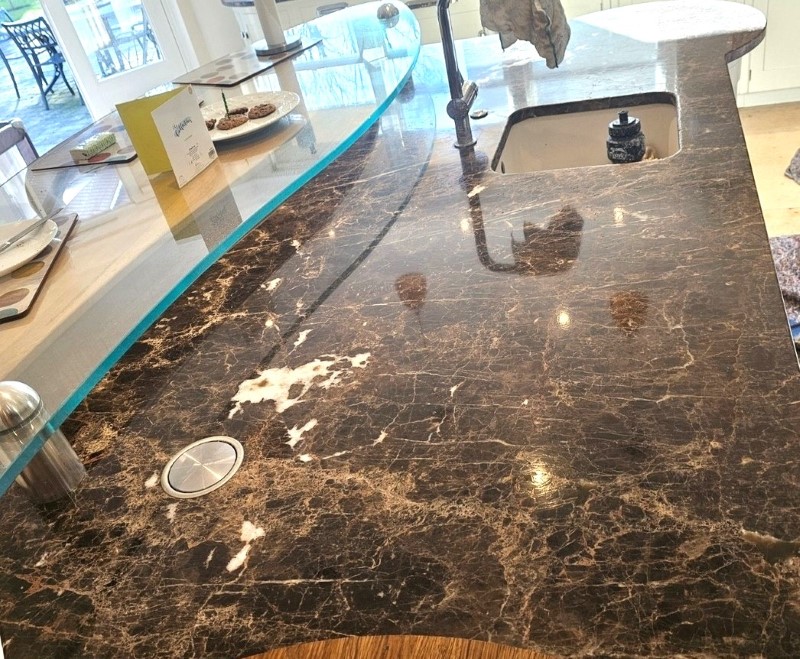
Whilst I was working on a stone floor at a property in Surbiton I was asked if I could do anything about the Marble Countertops in the Kitchen. The Marble had almost completely lost its shine and the owner was keen to have those re-polished to finish the kitchen renovation.

Dull Marble Kitchen Countertop Before Polishing Surbiton

Fortunately, the methods and products we use to renovate stone floors can also be used to restore stone worktops as well. The only difference being we can’t use 17” floor buffers on worktops and countertops so for those we source smaller 6” pads.

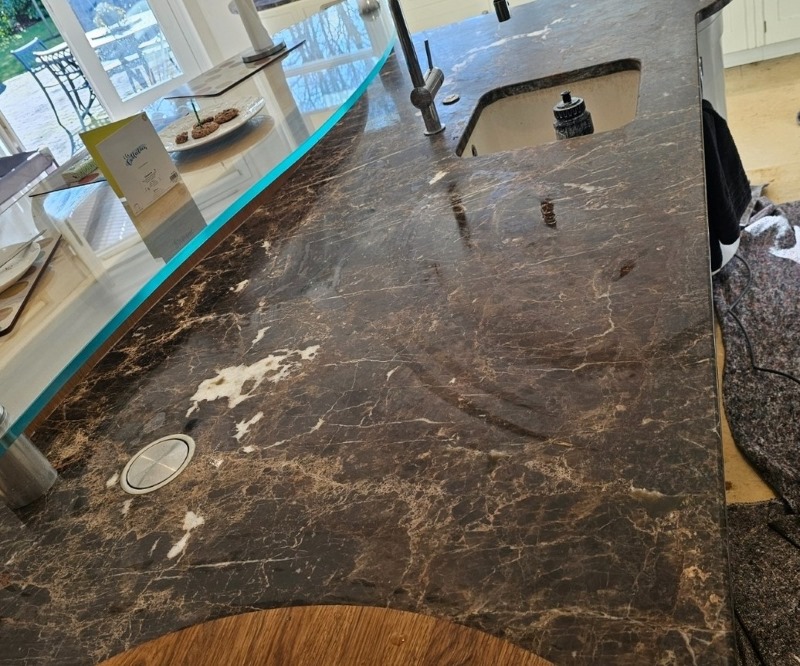
The countertop had been worked on before by a different company previously but they had done a horrible job. Bu the time I was asked to look at it the Marble was very dull and covered in different marks, staining from acidic food and lots of etching.

Dull Marble Kitchen Countertop Before Polishing Surbiton

Polishing a Marble Kitchen Countertop

First thing we did was to cover the kitchen in drop cloth and grey blankets to stop the slurry that’s generated during polishing dripping onto the stone floor below.

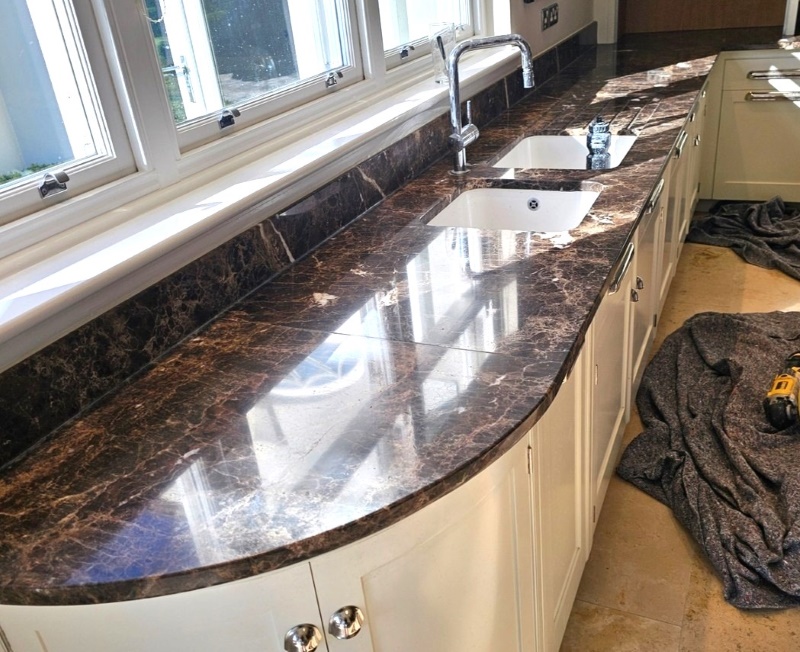
I then worked through a set of Diamond encrusted Burnishing pads fitted to a handheld DeWalt machine. The pads are applied to the Marble in sequence from 400 to 1500 grit using water for lubrication and then the waste is extracted after each pad using a small Numatic wet vacuum. I inspected the stone after the first pass through the pads and decided it could be better so started again working my way back up through the pads. You can see from the photographs there was a lot of Marble worktop to cover so this did take some time.

Sealing a Marble Countertop

I then left the stone to dry overnight and returned the following day to finish the job starting with a damp test on an electronic moisture meter which showed the Marble was dry.

To bring up a deep shine on the Marble the countertop was given a final polish with a very fine 3000 grit pad using a little water sprayed onto the surface. This final pad adds a nice deep shine to the stone and although it leaves the surface dry, I left an air blower running for a while to make sure.

Later that day I applied a few very fine coats of Tile Doctor X-Tra Seal and gave the surface another buff with a microfiber cloth. This sealer is an impregnator that soaks into the pores of the Marble preventing contaminants from becoming ingrained there and ensuring they remain on the surface where they can easily be cleaned away. Being an oil-based sealer, it really helped to bring out the beauty and colour of the Marble.

Dull Marble Kitchen Countertop After Polishing Surbiton

For the aftercare of stone worktops, we recommend the use of Stone Patina Spray which is a spray-and-buff cleaner that is designed to enhance the natural beauty and lustre of polished stone as it cleans.

Dull Marble Kitchen Countertop After Polishing Surbiton


Professional Restoration of a Marble Kitchen Worktop in South London

Restoring the Polish to a Marble Kitchen Countertop in Surbiton Read More »

Acid Damaged Marble Tabletop Renovated in Putney

Restoring the Appearance of a Marble Coffee Tabletop in Putney

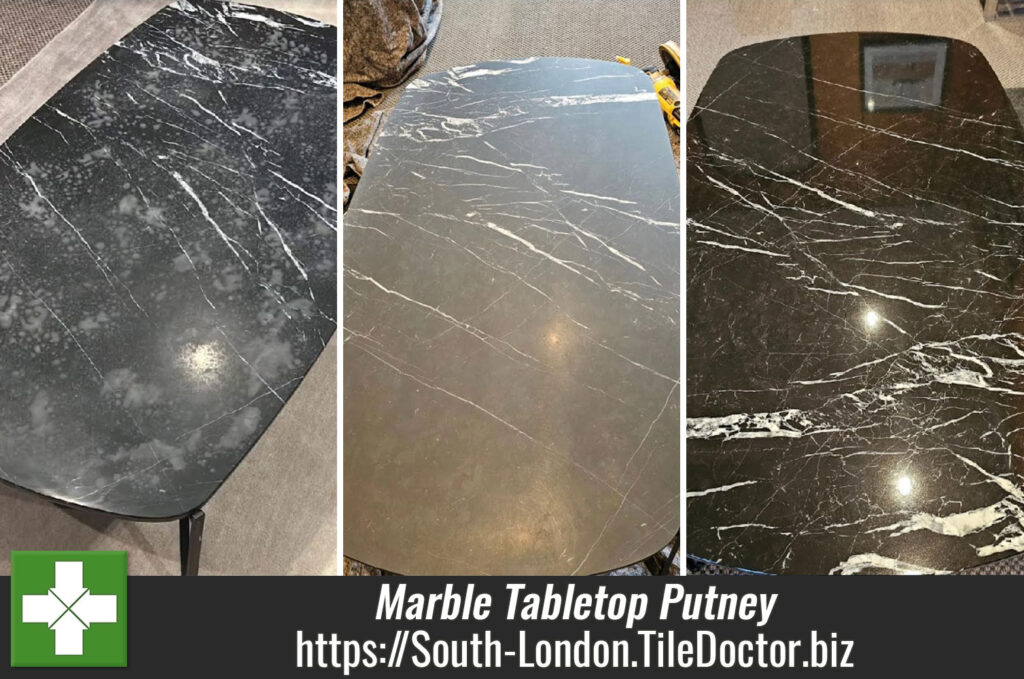
The photographs below are from a client in Putney, and show what will happen to a Polished Marble tabletop if you try and clean it with Viakal. Marble is made from calcium and magnesium carbonate which makes it acid sensitive, Viakal on the other hand is an acid cleaner blended from Formic and Citric acids resulting in a pH level of 2.2. This product uses the acid to dissolve the calcium and magnesium deposits in Limescale.

Acid Etched Polished Marble Table Before Renovation Putney

To be fair to Viakal the label does state not to use it on natural stone, but who reads the label, certainly my clients cleaner hadn’t. The result was the acid had etched the lovely, polished Marble surface and it appeared to be ruined.

I was happy to re-assure my client that the etching could be removed, however, to do this the table would need to be burnished with a set of diamond pads of different grades. This process cuts into the stone with a coarse pad to remove the etching and then slowly builds back the polished appearance using finer grades of pad. The table was very heavy however so the work would need to be done on-site.

Polishing a Marble Tabletop

Due to the weight of the stone table, it couldn’t really be moved so my first job was to relocate nearby furniture, roll up the rug and cover everything in blankets and a drop cloth. The last thing I wanted was any other possessions getting splashed during the burnishing process.

When polishing Marble floor tiles, I would normally use large 17-inch diamond pads fitted to a rotary floor buffer, however that simply wouldn’t work on a table, so I ordered a set of 6-inch burnishing pads from Tile Doctor instead. These smaller pads fit nicely on a hand-held buffer that would be perfect for this situation.

The burnishing process involves working through the pads in sequence. I started with the coarse 100, 200 and then 400-grit pads applied with a little water, these coarse pads were able to remove the etching and ingrained dirt. The table was rinsed down and then the 800-grit medium pad was applied which is the first step in the polishing process. Again, this pad is applied with water to lubricate, and the table was rinsed down afterwards.

Acid Etched Polished Marble Table During Renovation Putney

The process was repeated with the 1500-grit fine pad and then the 3000-grit very fine pad to bring up a really nice shine to the Marble table, I should mention the last pad is applied dry with only a tiny amount of water sprayed onto the surface.

Sealing a Marble Table

The last step was to seal the stone to protect it going forward. I used Tile Doctor X-Tra Seal for this, it’s an oil-based impregnator and I figured the oil in the sealer would mask any marks that I wouldn’t be able to remove, however I actually ended up removing all the etching so the sealer just gave the stone a really nice colour and gloss.

Acid Etched Polished Marble Table After Renovation Putney

My customer was very pleased with the work and said that the table looked better than it ever had before. NB. For the aftercare cleaning of a polished Marble coffee table like this I recommend the use of Tile Doctor Stone Patina Spray which has been especially formulated for the regular cleaning of stone worktops.


Professional Restoration of a Marble Tabletop in South London

Restoring the Appearance of a Marble Coffee Tabletop in Putney Read More »

Scroll to Top