grout colouring

Professional Restoration of Kitchen Quarry Tiles in Twickenham

Neglected Quarry Tile and Grout Professionally Cleaned in Twickenham Kitchen

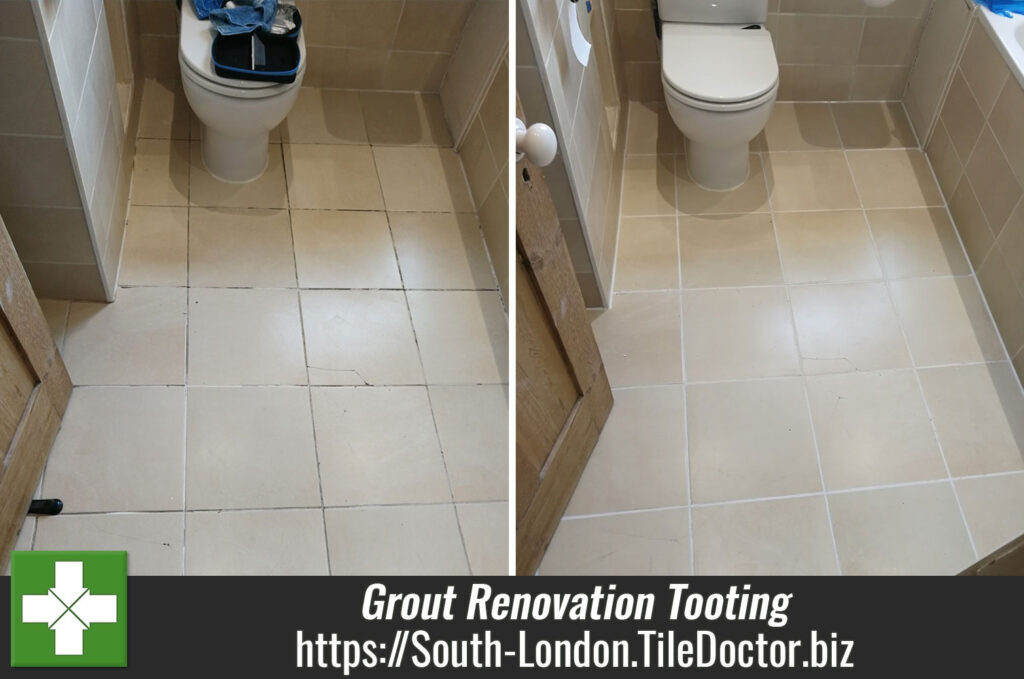
This Quarry tiled floor was installed in the kitchen of a property in Twickenham thirty-eight years prior. The tiles had never been professionally cleaned or sealed since installation and as you can see from the photograph both the tile and grout were in need of restoration.

Quarry Tiled Kitchen Floor Before Professional Tile Cleaning Twickenham

Having visited the property to inspect the floor I recommended giving the tile and grout a deep clean to remove the years of ingrained dirt and then sealing with a breathable sealant that would improve the appearance of the tiles. The main function of the sealer is to prevent dirt from becoming lodged in the porous clay tile, this keeps it on the surface where it can be easily cleaned away. Whilst at the property I also discussed potentially colouring the grout as it was badly stained and may not respond as hoped.

I worked out a quote for the restoration which was accepted and a date agreed for the work to start.

Deep Cleaning a Quarry Tiled Kitchen Floor

The first part of this job was the restoration of the tiles themselves; stained with years of ingrained dirt they needed a deep clean with a strong dilution of Tile Doctor Pro-Clean. For the best results this is sprayed onto the tile and grout and then left to soak in for ten minutes before scrubbing with the black pad fitted to a buffing machine.

The grout was also hand scrubbed at this point with a wire brush and more Pro-Clean, I find the pads can struggle to reach into the recesses of the grout line, so this ensures a better clean. Once done the soiled cleaning solution was then extracted using a wet vacuum.

Next the floor was given an acid rinse with Tile Doctor Grout Clean-Up which was mopped onto the floor and then brushed in. This further cleans up the tiles and removes old grout smears, it also neutralises the floor following the use of Tile Doctor Pro-Clean which is a strong alkaline.

The floor was then given a thorough rinse to remove any trace of product and dried as much as possible with the wet vacuum. Once done the floor was left to dry out for a few days.

Upon my return I noticed that as the floor dried several areas of efflorescence (White salts) had appeared, probably due to the amount of water needed during cleaning. This will have pushed salts up to the surface as the moisture in the tiles evaporated. To resolve this, I gave the floor a further clean with a weak solution of Tile Doctor Grout Clean-up which being an acidic dissolved the salts.

Applying White Grout Colourant to a Quarry Tiled Kitchen Floor

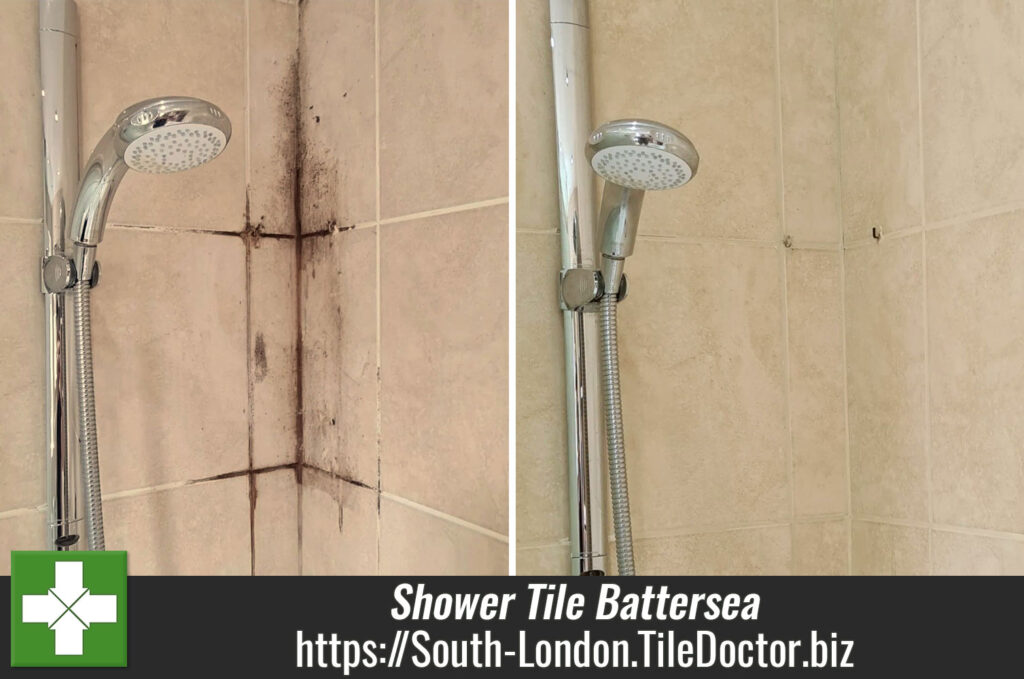
The floor was then inspected, and it was agreed that although the grout lines were much cleaner than before they were still stained in places, and this was bringing down the overall appearance of the tiles. So, it was decided to implement my contingency plan and colour the grout using a Tile Doctor Grout Colourant in White.

Quarry Tiled Kitchen Floor During Grout Colouring Twickenham

The colourant is painted onto the grout any excess is wiped off the adjacent tile as you progress. It doesn’t take long to apply however there were a lot of grout lines to cover due to the small size of the tiles.

Sealing a Quarry Tiled Kitchen Floor

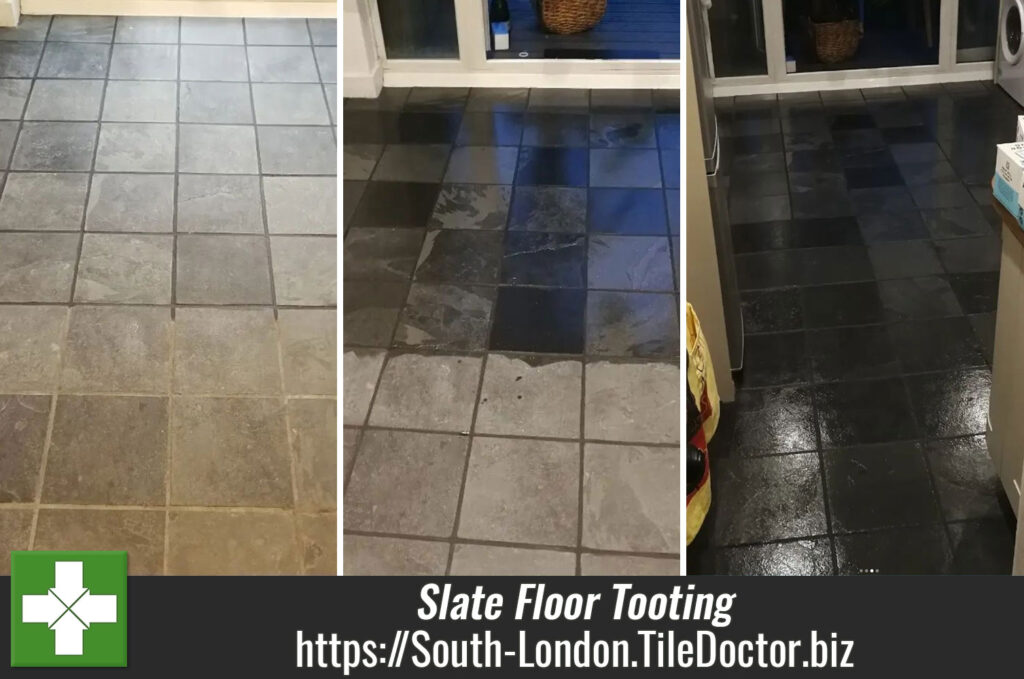
With the cleaning complete and the grout issues resolved it was time to move onto the final part of the floor restoration by sealing the tiles. Having discussed the required finish earlier the customer had chosen Tile Doctor Seal and Go Extra for this. This product provides a lovely low sheen finish and due to the porosity of the clay Quarry tiles it took seven coats before the floor was fully sealed.

Once complete the work really lifted the appearance of the quarry tiles which were more colourful and brighter. Also, the new sealer along with the protection provided by the Grout Colourant will make maintenance cleaning much easier.

Overall, the floor came out well and my client was very happy, leaving positive feedback and more work booked in for a later date.

Quarry Tiled Kitchen Floor After Professional Tile Cleaning Twickenham

Before leaving I recommended, they use Tile Doctor Neutral Tile Cleaner for cleaning going forward, this product is safe to use on sealed tiles and won’t harm the sealer.


Professional Restoration of a Quarry Tiled Kitchen in Southwest London

Neglected Quarry Tile and Grout Professionally Cleaned in Twickenham Kitchen Read More »

Bathroom Floor Tile Grout Renovation Lampton

Grout Recolouring of a Ceramic Tiled Bathroom Floor in Lampton

This client from Lampton near Hounslow was unhappy with the appearance of the grout in their Ceramic tiled bathroom floor and wondered if anything could be done to improve it. The grout was originally white to match the wall tiles and over the years it had darkened. This is quite a common problem with grout, especially in conjunction with glazed ceramic tiles; the glaze makes the tile impervious to water resulting in dirt being washed into the grout lines during cleaning. The rough cementitious surface of the grout traps the dirt eventually causing it to darken.

Bathroom Floor Before Grout Colouring Lampton

I asked for some photographs, and we discussed the various options over the phone. I’m not a fan of replacing grout as it takes a long time, generates a lot of dust and you risk chipping the tiles in the process, also there is every chance the problem will come back. I therefore recommended cleaning the grout and then applying a Tile Doctor Grout Colourant in White.

Grout Colouring is much quicker than re-grouting and you have the additional advantage of the colourant forming a waterproof barrier over the grout thereby making it much easier to keep clean and protecting the grout underneath. The Tile Doctor range of grout colourants come in eleven different colours with White being the most popular.

I asked for some dimensions and the size of the tile. From that I was able to work out an accurate quote for doing the work including the replacement of mastic sealant where needed. Happy with my quote we agreed a date for the work to start which should take less than a day to complete.

Cleaning the grout in a Ceramic Tiled Bathroom

Work started by stripping out the silicone between the floor and wall tile, then cleaning up the grout with Tile Doctor Grout Colourant Pre-Treat cleaner. This is an acidic cleaning solution that is sprayed onto the grout and then scrubbed in. This cleans the grout joints, and the acidic nature of the cleaner helps prepare the grout to achieve a better bond with the colourant. Once done the grout was wiped with a wet sponge to remove the dirt and then dried ready for the colourant.

Sealing the grout in a Ceramic Tiled Bathroom

Once the grout was dry a White grout colourant was painted onto the grout using a small colourant applicator that screws onto the top of the bottle, wiping off any excess from the tile as I went.

With the grout colouring complete I ran a bead of fresh White silicone sealant around the perimeter of the floor and the job was complete. A fairly simple process but very effective and in this case, it transformed the appearance of the bathroom making it far more inviting.

Bathroom Floor After Grout Colouring Lampton


Professional Restoration of Grout in a Ceramic Tiled Bathroom in Southwest London

Grout Recolouring of a Ceramic Tiled Bathroom Floor in Lampton Read More »

Bathroom Floor Grout Restoration in Tooting SW17

Bathroom Floor Tile Grout Restoration in Tooting SW17

A client was renovating a house in Tooting and wanted to see what could be done to improve the Ceramic floor tiles in the bathroom without the expense of a major overhaul. Having discussed the floor over the phone I was confident it could be improved and agreed a date to come over and survey the tiles and provided a quote for their renovation.

Bathroom Floor Grout Before Restoration in Tooting SW17

Except for one cracked tile, the tiles were in good condition and I could see it was really the grout that was bringing the bathroom down. The grout was generally discoloured and some had cracked and become loose. This cracking issue is indicative of using an inflexible grout when tiling on a wooden floor as these floors tend to have a bit of movement in them.

I discussed my renovation plan with the customer and provided a quote for carrying out the work which was accepted.

Renovating Bathroom Floor Grout

On the first day I set about raking out the cracked grout and stripping out the silicone between the tile and the bath. Silicone seems to attract mould and although it can be cleaned to some extent, I usually find its more effective to simply replace it. I then tidied up the bathroom to remove the waste grout and silicone, so the area was ready for grouting. I used a flexible White grout for this in order to match the original, although most of that was no longer White due to the staining.

I left the grout to set overnight and returned the next day to complete the job starting with the re-application of the silicone sealant, again in White but this time using an anti-mould variety. My attention then turned to the floor tile grouting which of course was now a mixture of fresh new grout and stained grout. I had realised this would be the result, so I had come prepared and was ready to apply Tile Doctor Grout Colourant in white to make everything uniform.

Before applying the colourant, I prepped the grout joint with Tile Doctor Pre-treat cleaner that is an acidic cleaning solution that is sprayed onto the grout and then scrubbed in. This cleans the grout joints, and the acidic nature of the cleaner helps prepare the grout to achieve a better bond with the colourant. The grout was then wiped with a wet sponge to remove the dirt and then dried ready for the colourant. Although the cleaner had helped to clean the grout and remove surface dirt it can’t do anything about deep seated staining, so colouring was still necessary.

Once the grout was dry the White grout colourant was painted onto the grout using a small brush wiping off any excess from the tile as I went. The Tile Doctor range of Grout Colourants come in eleven different colours and form an epoxy barrier over the grout preventing dirt from reaching the grout line and making it much easier to keep clean.

Bathroom Floor Grout After Restoration in Tooting SW17

Once the colourant had dried, I gave the floor a quick clean with Tile Doctor Neutral Tile Cleaner to get the ceramic tiles clean and the job was complete. The refreshed grout now has a consistent white appearance, and it really lifted the appearance of the bathroom.


Professional Restoration of a Bathroom Floor Grout in South London

Bathroom Floor Tile Grout Restoration in Tooting SW17 Read More »

Shower Tile and Grout Cleaned and Renovated in Battersea Shower Cubicle

Ceramic Tiled Shower Cubicle Refreshed in Battersea

I was contacted by a customer in Battersea who was concerned about the state of their Ceramic Tiled shower cubicle. Ceramic tiles are glazed so usually very easy to keep clean however grout has a rough surface and attracts dirt easily. Where this happens it best to keep on top of the problem with regular cleaning as once you get a deep-seated stain on grout it’s very difficult to get it clean again.

The photograph below shows the worst of the problem where dirt had collected behind a wire basket that was fixed to the wall. The basket allowed dirt to build-up behind it and had deposited rust on the tile and grout.

Ceramic Shower Before Tile Cleaning Battersea

Maintaining grout is a large part of the work Tile Doctor does and we have several tried and tested products and processes for doing this. Having spoken to the client over the phone and having been sent photographs via email I created a quote for the work which should only take a few hours. My customer was happy with the quote and we agreed a date to do the work.

Cleaning a Ceramic Tiled Shower Cubicle

To begin, I cleaned the grout lines using our acidic cleaning product, Tile Doctor Grout Clean-Up. The product is decanted into a spray bottle and sprayed onto the tile and grout where it was left to dwell for ten minutes before being scrubbed in with a handheld scrubbing brush. Spraying the solution onto the wall mixes it with air to make it lighter and more able to stick to the wall.

Being a concentrated phosphoric acid cleaner, Grout Clean-Up effectively removes mineral deposits including rust and old grout smears from the tile surface to leaving it looking much fresher, it also prepares the grout for a superior bond with the grout colourant that was to be added later.

Following this, I rinsed down the tile and grout with water to remove the dislodged dirt. The next step was to remove all the existing silicone mastic with a sharp knife; the mastic sealant stained with mould and much in need of replacement. Once all the rubbish was swept out, I dried any remaining dampness from the grout and tiles with a heat gun.

I then moved onto to recolouring the grout using a Tile Doctor Grout Colourant which is simply painted onto the grout lines using a small brush and any excess wiped of the tile before it dries. There are eleven colours available in the Tile Doctor colourant range and in this case, we chose a colour to match the tiles.

Ceramic Shower After Tile Cleaning Battersea

The application of Grout Colourant not only colours the grout joints – it also seals the grout in so dirt can’t become stuck in its rough surface, this also makes it very easy to clean going forward.

Once the restoration was finished, I resealed the shower base with fresh mould resistant silicone mastic to match the tile and grout. Tile Doctor don’t sell this but there are many makes available from local DIY stores.


Ceramic Tiled Shower Cubicle Cleaning and Grout Recolouring in South London

Ceramic Tiled Shower Cubicle Refreshed in Battersea Read More »

Black Slate Kitchen Floor Renovation Tooting

Black Slate Tiled Kitchen Floor Renovated in Tooting

The photos below are of a Black Slate Kitchen floor at a property in Tooting SW17, which as you can see had lost all its colour and character. I went over to survey the floor and discussed a renovation plan with the owner.

One of the problems was the grout which like the tile hadn’t faired very well over the years and being in the Kitchen was subject to staining. I explained that like all stone floors the Slate needed to be sealed in order to keep the dirt out of its pores and keep it looking its best. Sealers however wear down with use and in this case the floor hadn’t been deep cleaned and sealed for some time.

I costed out a renovation plan which included deep cleaning the Slate tile removing any remaining sealer in the process, renovating the grout, and then re-sealing the whole floor to bring back the appearance of the stone and protect it going forward. Happy with the quote we agreed a date to start the work.

Deep Cleaning a Natural Black Slate Tiled Kitchen Floor

Normally I would use a Tile Doctor product called Remove and Go to remove the sealer, however in this case testing had shown that what was left of the sealer could be removed with Pro-Clean which is also our go to Tile and Grout Cleaner.

I used a strong dilution of Pro-Clean to do this, spraying it onto the floor and leaving it to soak in for ten minutes and break down the dirt etc. Then using a black scrubbing pad fitted to a heavy rotary buffer machine it was worked into the Slate to release the dirt and old sealer. The floor was then rinsed with water and the soiling extracted with a wet vacuum.

The pads can struggle to get into the corners and edges of the floor and the recesses of the grout line. So, to complete the cleaning a handheld scrubbing brush was used and a wire brush run along the grout lines, again with more Tile Doctor Pro-Clean. After another rinse and extraction with the wet vacuum the floor was left to dry aided with a couple of floor blowers.

Grout Colouring and Sealing Black Slate Tiled Kitchen Floor

Once dry the grout was coloured with a Black Tile Doctor grout colourant which is basically painted onto the grout with a small brush and any excess wiped off the tile. This grout colourant gives the grout a uniform appearance and adds an impenetrable barrier over the grout sealing it in and keeping it safe from further staining. Keeping grout clean in a kitchen is always a problem so the colourant will protect it and make it very easy to clean.

Black Slate During Cleaning Grout Colouring Tooting

The last step was to seal the Slate for which I used Tile Doctor X-Tra Seal. This was chosen because it’s an impregnating oil-based sealer that will restore the beautiful dark colour in the stone. Impregnators work by occupying the tiny pores in the stone thereby forcing dirt to remain on the surface where they can easily be cleaned away.

Black Slate During Sealing Tooting

In the subject of maintenance cleaning, I recommend the use of Tile Doctor Neutral Tile Cleaner which is a gentle but effective cleaner that won’t harm the sealer. Many of the floor cleaning products you find in supermarkets etc are not for use on sealed stone, they contain strong chemicals such as bleach etc which will strip off the sealer prematurely so best avoided.

Black Slate After Renovation Tooting


Professional Renovation of Black Slate Tiled Kitchen Floor in South London

Black Slate Tiled Kitchen Floor Renovated in Tooting Read More »

Scroll to Top