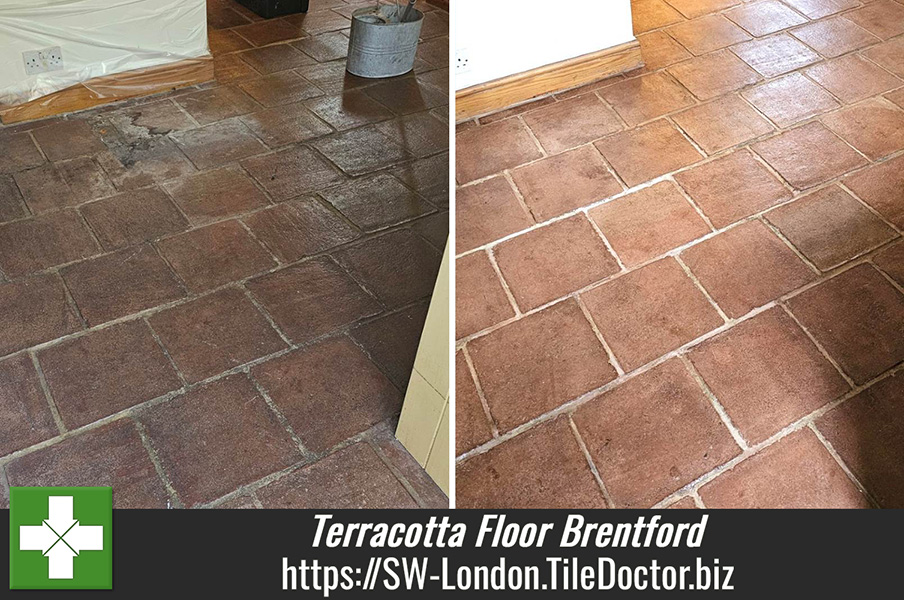
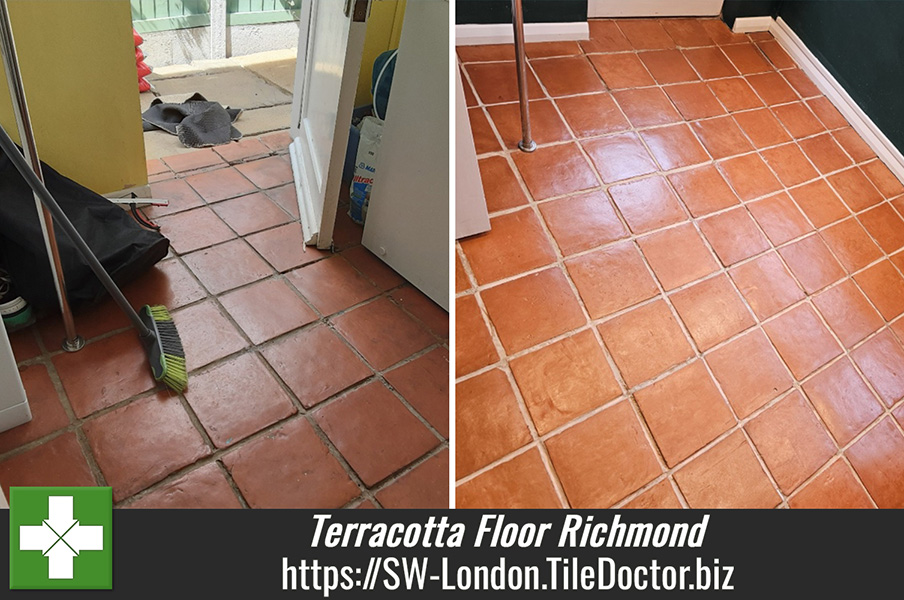
grout cleaning

Terracotta Tiled Kitchen Floor Renovation Brentford

Renovating a 27-year-old Terracotta Tiled Kitchen Floor in Brentford

This job is a terracotta tiled kitchen floor at a property in Brentford that was laid 27 years ago and then sealed using wax. Since then, it hasn’t been properly maintained the entire time they have been down and was looking dark and permanently dirty.

Terracotta Tiled Kitchen Floor Before Cleaning Brentford Terracotta Tiled Kitchen Floor Before Cleaning Brentford

Sometimes I can quote for renovating a floor from photos, however, in this case I made sure to book a survey as I could see that the tiles were heavily soiled, as you would expect from 27 years of use with no cleaning. On inspection of the tiles, I could see there was a lot of stripping that needed to happen to remove what was left of the wax.

I explained to the clients the process and the limitations and discovered their expectations for the floor. What the client was looking for was for the tiles to be as clean as possible with a good gloss on the top for easier mopping and maintenance. Once I had this information, I worked out a price and booked the work in.

Cleaning a Terracotta Tiled Kitchen

Once everything was protected, I carried out a damp proof reading on the tiles, noted it down and then applied Tile Doctor Remove and Go stripper to the top of the tiles. I mopped this around for 5 minutes and then agitated with a brush. Once happy it was taking effect, I used coarse carbide brush to scrub the solution in and remove the old sealer. Once complete and the resultant soiling rinsed away and extracted, I was able to inspect the floor and confirm the sealer had been removed.

Happy with stage 1, work progressed to the next step which involved covering the entire floor in a thick layer of Tile Doctor Acid Gel and allowed it to sit for 15 minutes. I did this to prevent too much penetration from the water during the next cleaning phase, but clay tiles like Terracotta react very well to acid during cleaning aiding the whole process. The next step was to use the rotary machine fitted with a black pad and give the tiles a good deep clean. I worked methodically ensuring not to flood the entire floor and again working in sections to allow me to vacuum off the surface water to avoid too much penetration into the tile.

Once happy with this I took a wire brush and cleaned the grout, although it had already mostly been cleaned by the carbide brush on the handheld it allows me to get down and close to the floor so that I can easily spot areas that may have been missed. I then said my goodbyes to the client and went away for 2 days, leaving a fan behind that they moved around to different sections of the floor each day until dry.

Sealing a Terracotta Tiled Kitchen

I stayed in contact with the client leading up to the sealing day and we determined the floor was ready to go. On arrival I took a damp meter reading and after comparing it to the one I took earlier was happy with the result.

Sealing the floor began with the application of Tile Doctor Seal and Go Extra and a paint pad. Four coats of sealer were applied. This is a fully breathable modern acrylic sealer that performs well on Terracotta improving its appearance and adding long lasting protection.

The following day the client called to say that the floor looked a bit dull in places, so I immediately booked them in for the bank holiday Monday and made my way back. On arrival I could see that not all areas of the floor had taken the sealer as well as I thought so I proceeded to apply another 6 coats. Terracotta is a very porous clay-based material and so this is not unusual.

Terracotta Tiled Kitchen Floor After Renovation Brentford

The floor looked even better after this so I’m glad they requested a call back, visiting Terracotta floors more than once can happen, the most important thing is getting the correct results in the end with the least amount of disruption possible.

Terracotta Tiled Kitchen Floor After Renovation Brentford

For aftercare cleaning I recommended the client use Tile Doctor Ph Neutral Cleaner. It’s a mild yet effective floor cleaner that’s safe to use on sealed tiles.


Professional Restoration of a Terracotta Tiled Kitchen in South London

Renovating a 27-year-old Terracotta Tiled Kitchen Floor in Brentford Read More »

Terrazzo Tile Grout Haze Removal Barnes

Grout-Stained Terrazzo Hallway Floor Renovated in Barnes

The pictures below come from a property in Barnes near Richmond upon Thames where a hallway floor had been laid with Terrazzo tiles. The tiles had been laid well but unfortunately the tiler had spread grout all over the tiles and not cleaned it off properly.

This is not uncommon when tiling a floor and is known in the trade as Grout Haze or Grout Smearing, the results in a haze over the tiles which detracts from their appearance. To make things even worse however, the tiler had then applied a sealer over the Terrazzo with the grout still on there. This locked in the hazy finish and left the tiles looking dull.

Terrazzo Floor Grout Haze Before Cleaning Barnes

Since that time the sealer had worn down and the floor had collected lots of ingrained dirt, leaving it darker and discoloured and subdued.

I was called in to renovate the floor and having surveyed the tiles I recommended burnishing the tiles with a set of Tile Doctor Burnishing Pads which are made from different grades of industrial diamonds. They clean the floor, removing staining such as the grout haze and build an attractive sheen on the Terrazzo. Once done I would re-seal the floor with a natural look sealer.

I worked out a quote which was accepted, and a date set for the work to start.

Cleaning a Terrazzo Tiled Hallway

Work started with the application of the first burnishing pad which is a coarse 400-grit and this is attached to a floor buffing machine that had an extra 55kg of weight added. The pad is run over each tile several times using only water for lubrication. The water turns black with the dirt released from the floor and after completing the whole floor it is rinsed away and extracted with a wet vacuum.

This process is then repeated with the finer pads of 800 and 1500 grit which start to build a polish onto the tile. After each pad is run over the floor the slurry is rinsed off and extracted as before. The last burnishing pad is a super fine 3500-grit, and this is applied dry with just a little water sprayed onto the tile to really bring up the shine.

Terrazzo Floor Grout Haze During Burnishing Barnes

Sealing a Terrazzo Tiled Hallway

The floor was left to dry off overnight and the next day I returned to seal it with Tile Doctor Ultra Seal which is a natural look almost invisible sealer that doesn’t alter the appearance of the tiles. It is an impregnating sealer that soaks into the tile, occupying the pores and thereby preventing dirt from residing there, thus keeping the dirt on the surface where it can be easily cleaned away.

Regarding cleaning, I recommended the use of Tile Doctor Stone Soap, it is a gentle but effective tile cleaner made to a special formula that helps maintain the patina on the tile. It’s important to use a product like this for cleaning a sealed floor as many of the products you find in supermarkets are simply too strong and will damage the sealer.

Terrazzo Floor Grout Haze After Renovation Barnes

The Terrazzo responded well to the burnishing and my client was very happy with the floor which had never looked like it should. As it turns out he is also the owner of three large independent cinemas in London with over 1000m2 Terrazzo spread across them and because of this job I’ve now been asked to go and do the same there too.


Professional Renovation of a Terrazzo Tiled Hallway in Southwest London

Grout-Stained Terrazzo Hallway Floor Renovated in Barnes Read More »

Severe Mould Stained Marble Tiled Bathroom Restoration Twickenham

Mould-stained Marble Tiled Bathroom Restoration in Twickenham

As you can see from the photographs below this Marble tiled bathroom at a property in Twickenham had a very bad case severe case of mould staining. The client was trying to decide if the tiles were too far gone for restoration after letting a property for the past 4 years, the tenants unfortunately didn’t let him know the state of things.

Severe Mould Stained Marble Tiled Bathroom Before Cleaning Twickenham

Keen to have the problem resolved quickly I managed to move some things around called into the property the following day. I was confident that the mould could be removed however you do need to be careful with Marble as its acid sensitive, also I could see the tiles had a factory seal so proceeded with caution and was able to demonstrate that the problems could be rectified.

Severe Mould Stained Marble Tiled Bathroom Before Cleaning Twickenham

Happy with the proposed solution and keen to get the property back on the rental market I was immediately booked to return the following week.

Cleaning Mould from Marble Bathroom Tiles

Day one for this job was to remove all mould from the tiles. To do this I lightly rubbed Tile Doctor Acid-Gel into small sections of the tiles until I could see the clean surface and then immediately washed off with clean water, making sure I got every part of the tiles to avoid any runoff.

Work proceeded in this manner until all the tiles free of mould and dirt. With the mould staining removed I noticed some of the tiles were effected by grout haze which happens when the tiler fails to polish off all the grout during installation. It wasn’t part of the initial quote however I felt obliged to deal with it so more Acid Gel and elbow grease was applied until that was removed allowing the details of the Marble tiling to come through.

Next step was to treat the grout lines using a similar process with Acid Gel but for this I used a wire brush to remove surface staining leaving the grout clean and returning the grout lines to their original colour.

To bring up the appearance of the Marble tiling a six-inch 1500-grit burnishing pad fitted to a handheld machine was run over each tile several times using only water for lubrication. This was then followed with a very fine 3500-grit pad to bring up the polish.

Once I was happy that the finish on the Marble tiles was as good as it could get, I then re-inspected the grout and decided to replace some areas of grouting that had suffered deep staining. I used a coloured grout to match what was originally there.

Last step before leaving for the day was to strip out all the silicone sealant from the wall verticals and along the bath and allowed the joints to dry overnight.

Applying a Grout Colourant to Marble Bathroom Tiles

The next day I returned the next day to finish the project off starting with an inspection to ensure nothing had been missed. At this point I felt the grout could still be improve so all grout lines were coloured with a Tile Doctor Grout Colourant to ensure a consistent appearance. I was hoping to avoid this but I felt it was the best solution to bring the bathroom to an “as new” appearance. The colourant also acts as a barrier over the grout making it much easier to keep clean.

Last step was to apply new mould resistant silicone sealant to the verticals and along the bath which finished off the project nicely. They still had some work to do including painting the ceiling but from my point of view I was very happy with the way the Marble tile and grout had responded to the treatment.

Severe Mould Stained Marble Tiled Bathroom After Cleaning Twickenham

My work was done so I called the client who was keen to come over and look. To say they were shocked is an understatement, they were considering ripping all the tiles out and replacing but luckily, we saved them a small fortune. For aftercare I advised increasing the ventilation and using a mild cleaning product such as Tile Doctor Aqua Pro.

Severe Mould Stained Marble Tiled Bathroom After Cleaning Twickenham


Professional Restoration of a Marble Tiled Bathroom in Southwest London

Mould-stained Marble Tiled Bathroom Restoration in Twickenham Read More »

Professional Restoration of Kitchen Quarry Tiles in Twickenham

Neglected Quarry Tile and Grout Professionally Cleaned in Twickenham Kitchen

This Quarry tiled floor was installed in the kitchen of a property in Twickenham thirty-eight years prior. The tiles had never been professionally cleaned or sealed since installation and as you can see from the photograph both the tile and grout were in need of restoration.

Quarry Tiled Kitchen Floor Before Professional Tile Cleaning Twickenham

Having visited the property to inspect the floor I recommended giving the tile and grout a deep clean to remove the years of ingrained dirt and then sealing with a breathable sealant that would improve the appearance of the tiles. The main function of the sealer is to prevent dirt from becoming lodged in the porous clay tile, this keeps it on the surface where it can be easily cleaned away. Whilst at the property I also discussed potentially colouring the grout as it was badly stained and may not respond as hoped.

I worked out a quote for the restoration which was accepted and a date agreed for the work to start.

Deep Cleaning a Quarry Tiled Kitchen Floor

The first part of this job was the restoration of the tiles themselves; stained with years of ingrained dirt they needed a deep clean with a strong dilution of Tile Doctor Pro-Clean. For the best results this is sprayed onto the tile and grout and then left to soak in for ten minutes before scrubbing with the black pad fitted to a buffing machine.

The grout was also hand scrubbed at this point with a wire brush and more Pro-Clean, I find the pads can struggle to reach into the recesses of the grout line, so this ensures a better clean. Once done the soiled cleaning solution was then extracted using a wet vacuum.

Next the floor was given an acid rinse with Tile Doctor Grout Clean-Up which was mopped onto the floor and then brushed in. This further cleans up the tiles and removes old grout smears, it also neutralises the floor following the use of Tile Doctor Pro-Clean which is a strong alkaline.

The floor was then given a thorough rinse to remove any trace of product and dried as much as possible with the wet vacuum. Once done the floor was left to dry out for a few days.

Upon my return I noticed that as the floor dried several areas of efflorescence (White salts) had appeared, probably due to the amount of water needed during cleaning. This will have pushed salts up to the surface as the moisture in the tiles evaporated. To resolve this, I gave the floor a further clean with a weak solution of Tile Doctor Grout Clean-up which being an acidic dissolved the salts.

Applying White Grout Colourant to a Quarry Tiled Kitchen Floor

The floor was then inspected, and it was agreed that although the grout lines were much cleaner than before they were still stained in places, and this was bringing down the overall appearance of the tiles. So, it was decided to implement my contingency plan and colour the grout using a Tile Doctor Grout Colourant in White.

Quarry Tiled Kitchen Floor During Grout Colouring Twickenham

The colourant is painted onto the grout any excess is wiped off the adjacent tile as you progress. It doesn’t take long to apply however there were a lot of grout lines to cover due to the small size of the tiles.

Sealing a Quarry Tiled Kitchen Floor

With the cleaning complete and the grout issues resolved it was time to move onto the final part of the floor restoration by sealing the tiles. Having discussed the required finish earlier the customer had chosen Tile Doctor Seal and Go Extra for this. This product provides a lovely low sheen finish and due to the porosity of the clay Quarry tiles it took seven coats before the floor was fully sealed.

Once complete the work really lifted the appearance of the quarry tiles which were more colourful and brighter. Also, the new sealer along with the protection provided by the Grout Colourant will make maintenance cleaning much easier.

Overall, the floor came out well and my client was very happy, leaving positive feedback and more work booked in for a later date.

Quarry Tiled Kitchen Floor After Professional Tile Cleaning Twickenham

Before leaving I recommended, they use Tile Doctor Neutral Tile Cleaner for cleaning going forward, this product is safe to use on sealed tiles and won’t harm the sealer.


Professional Restoration of a Quarry Tiled Kitchen in Southwest London

Neglected Quarry Tile and Grout Professionally Cleaned in Twickenham Kitchen Read More »

Bathroom Floor Tile Grout Renovation Lampton

Grout Recolouring of a Ceramic Tiled Bathroom Floor in Lampton

This client from Lampton near Hounslow was unhappy with the appearance of the grout in their Ceramic tiled bathroom floor and wondered if anything could be done to improve it. The grout was originally white to match the wall tiles and over the years it had darkened. This is quite a common problem with grout, especially in conjunction with glazed ceramic tiles; the glaze makes the tile impervious to water resulting in dirt being washed into the grout lines during cleaning. The rough cementitious surface of the grout traps the dirt eventually causing it to darken.

Bathroom Floor Before Grout Colouring Lampton

I asked for some photographs, and we discussed the various options over the phone. I’m not a fan of replacing grout as it takes a long time, generates a lot of dust and you risk chipping the tiles in the process, also there is every chance the problem will come back. I therefore recommended cleaning the grout and then applying a Tile Doctor Grout Colourant in White.

Grout Colouring is much quicker than re-grouting and you have the additional advantage of the colourant forming a waterproof barrier over the grout thereby making it much easier to keep clean and protecting the grout underneath. The Tile Doctor range of grout colourants come in eleven different colours with White being the most popular.

I asked for some dimensions and the size of the tile. From that I was able to work out an accurate quote for doing the work including the replacement of mastic sealant where needed. Happy with my quote we agreed a date for the work to start which should take less than a day to complete.

Cleaning the grout in a Ceramic Tiled Bathroom

Work started by stripping out the silicone between the floor and wall tile, then cleaning up the grout with Tile Doctor Grout Colourant Pre-Treat cleaner. This is an acidic cleaning solution that is sprayed onto the grout and then scrubbed in. This cleans the grout joints, and the acidic nature of the cleaner helps prepare the grout to achieve a better bond with the colourant. Once done the grout was wiped with a wet sponge to remove the dirt and then dried ready for the colourant.

Sealing the grout in a Ceramic Tiled Bathroom

Once the grout was dry a White grout colourant was painted onto the grout using a small colourant applicator that screws onto the top of the bottle, wiping off any excess from the tile as I went.

With the grout colouring complete I ran a bead of fresh White silicone sealant around the perimeter of the floor and the job was complete. A fairly simple process but very effective and in this case, it transformed the appearance of the bathroom making it far more inviting.

Bathroom Floor After Grout Colouring Lampton


Professional Restoration of Grout in a Ceramic Tiled Bathroom in Southwest London

Grout Recolouring of a Ceramic Tiled Bathroom Floor in Lampton Read More »

Quarry Tiled Kitchen Floor Renovation Worcester Park

Renovating a Quarry Tiled Kitchen Floor in Worcester Park

I was asked to renovate a Quarry tiled floor in the Kitchen of an older property in the South London suburb of Worcester Park . I was informed the Quarry tiled floor was in fact 130 years old Quarry floor and had not been professionally cleaned for 45 years.

I went over to the property to survey the tiles and could see the tile and grouting had experienced a lot of staining over the years. The floor had layers of old sealer, which I suspect was a wax-based product, as well as paint, adhesives and cement. All of which would need to be removed

Quarry Tiled Kitchen Floor Before Renovation Worcester Park

I worked out a quote that would involve stripping the floor, deep cleaning the tiles and then re-sealing with a modern sealer. The client was happy with my quote, and so we scheduled a date for the work to start.

Deep Cleaning and Restoring a Quarry and Quarry Tiled Floor

To strip the floor of old sealers etc. I applied a strong dilution of Tile Doctor Remove and Go and left it to soak into the Quarry tiles for a good ten to fifteen minutes. The solution was then worked in with a Carbide Brush fitted to a weighted rotary floor buffer. The resultant slurry was rinsed away and then extracted with a wet vacuum. The floor was then inspected and repeated with stubborn areas spot treated with hand tools until I was happy all the old sealer was gone.

The grout lines also need attention so these were scrubbing by hand using Tile Doctor Pro-Clean and a wire brush. I find this is the best way to clean grout as pads can struggle to reach into the recesses of the grout. Some of the grout was badly stained however so short of replacing it the best I could do was to get it as clean as possible. Once done I rinsed the floor with water again and extracted the soiling with a wet vacuum as before.

Last step in the cleaning process was to treat the floor to an acid rinse using a medium dilution of Tile Doctor Grout-Clean-up. This is an acidic product that will dissolve old grout smears, efflorescence and other mineral deposits left of the tiles, it also neutralises the pH level of the floor following the use of Remove and Go which is a strong alkaline. The product is brushed into the tiles and then removed as before with more water and a wet vacuum.

After a final rinse the floor was dried as much as possible using the wet vacuum and left to dry off overnight.

Sealing a Quarry Tiled Barn Conversion Floor

Returning the next I started by taking several readings with a damp meter. It’s not a good idea to apply a sealer to a damp floor as the results can be inconsistent so I always like to check. The readings were within tolerance so I was able to apply the first of what would be six coats of Tile Doctor’s Seal and Go Extra which I felt was the best choice for sealing this floor. The floor looked patchy for a while and I was slightly concerned however the sealer eventually filled the tiles up and was left with a nice finish.

I chose Seal and Go Extra because it’s a fully breathable sealer that adds a nice subtle sheen to the tiles which matches the customers’ expectations. It was important to choose a breathable sealer as these old floors don’t have the benefit of a damp proof membrane and any moisture under the floor will be able to rise through the tile and evaporate at the surface un-hindered.

Quarry Tiled Kitchen Floor After Renovation Worcester Park

Once completed, the floor looked fantastic, not only was the Quarry Tile and Grout looking so much cleaner the sealer had enhanced the orange colour in the Quarry tiles. Needless to say, my customer was very happy with the result.

For aftercare I recommended Tile Doctor Neutral Tile Cleaner which is designed for the safe and effective cleaning of sealed floors without impacting the sealer.

Quarry Tiled Kitchen Floor After Renovation Worcester Park


Professional Cleaning of a Quarry Tiled Floor in South London

Renovating a Quarry Tiled Kitchen Floor in Worcester Park Read More »

Limestone Floor Polishing Surbiton

Large Limestone Floor Cleaned, Polished and Sealed in Surbiton

This large Limestone tiled floor at a property in Surbiton had been recently maintained by a cleaning company who didn’t do a thorough job. They hadn’t done anything to improve the polish on the Limestone and unfortunately stripped off the original sealer during cleaning leaving it vulnerable to ingrained dirt.

Limestone Floor Before Cleaning Surbiton Limestone Floor Before Cleaning Surbiton

The stone floor now looked very flat and lifeless and I was asked to do the job properly, including deep cleaning the grout, polishing the stone and finally replacing the sealer.

Stripping and Polishing Tumbled Limestone Tiles

I started work by focusing on the grout which had become darkened with dirt. For this I applied a strong dilution of Tile Doctor Pro-Clean along the grout lines, left it to soak in for a few minutes and then worked it in with a wire brush. This process turned the grout from Black back to White and the dirt was rinsed off with water and extracted with a wet vacuum.

Limestone Floor During Cleaning Surbiton Limestone Floor During Grout Cleaning Surbiton

The next step was to burnish the stone using a set of Diamond encrusted pads of increasing grits that range from a coarse 400-grit to a very fine 3000-grit. The pads are fitted to the rotary machine and are run across the whole floor lubricating with water which darkens as the dirt is lifted out of the stone. Each pad is moved slowly across the floor with the machine leaving small rings on each pass. The floor is then rinsed and all the slurry with a wet vacuum after each pad.

It was a large floor that extended from the hallway into the Kitchen so it took some time to cover every section thoroughly. I stopped one the 1500-grit pad had been applied and after another rinse and extraction left the floor to dry off overnight.

Sealing Limestone Tiles

I returned the next morning and set about sealing the floor with Tile Doctor Ultra-Seal which is an impregnating natural look sealer that soaks into the pores of the Limestone protecting it from within. The sealer will ensure any dirt remains on the surface where it can be easily cleaned away.

I left the sealer to dry for an hour before polishing the floor with the last in the set of burnishing pads which is a 3000-grit pad. I covered every angle of light to make sure I’d left no smudges anywhere. This pad is applied with only a little water sprayed on to the stone as its run over the surface, this technique is known as a spray burnish and leaves the floor dry.

Limestone Floor After Polishing Surbiton

Before leaving I took time to discuss aftercare cleaning which for polished stone floors, I recommend Tile Doctor Stone Soap which not only cleans but also help maintain the patina on polished stone.

Limestone Floor After Polishing Surbiton


Professional Renovation of a Large Polished Limestone Floor in South London

Large Limestone Floor Cleaned, Polished and Sealed in Surbiton Read More »

Bathroom Floor Grout Restoration in Tooting SW17

Bathroom Floor Tile Grout Restoration in Tooting SW17

A client was renovating a house in Tooting and wanted to see what could be done to improve the Ceramic floor tiles in the bathroom without the expense of a major overhaul. Having discussed the floor over the phone I was confident it could be improved and agreed a date to come over and survey the tiles and provided a quote for their renovation.

Bathroom Floor Grout Before Restoration in Tooting SW17

Except for one cracked tile, the tiles were in good condition and I could see it was really the grout that was bringing the bathroom down. The grout was generally discoloured and some had cracked and become loose. This cracking issue is indicative of using an inflexible grout when tiling on a wooden floor as these floors tend to have a bit of movement in them.

I discussed my renovation plan with the customer and provided a quote for carrying out the work which was accepted.

Renovating Bathroom Floor Grout

On the first day I set about raking out the cracked grout and stripping out the silicone between the tile and the bath. Silicone seems to attract mould and although it can be cleaned to some extent, I usually find its more effective to simply replace it. I then tidied up the bathroom to remove the waste grout and silicone, so the area was ready for grouting. I used a flexible White grout for this in order to match the original, although most of that was no longer White due to the staining.

I left the grout to set overnight and returned the next day to complete the job starting with the re-application of the silicone sealant, again in White but this time using an anti-mould variety. My attention then turned to the floor tile grouting which of course was now a mixture of fresh new grout and stained grout. I had realised this would be the result, so I had come prepared and was ready to apply Tile Doctor Grout Colourant in white to make everything uniform.

Before applying the colourant, I prepped the grout joint with Tile Doctor Pre-treat cleaner that is an acidic cleaning solution that is sprayed onto the grout and then scrubbed in. This cleans the grout joints, and the acidic nature of the cleaner helps prepare the grout to achieve a better bond with the colourant. The grout was then wiped with a wet sponge to remove the dirt and then dried ready for the colourant. Although the cleaner had helped to clean the grout and remove surface dirt it can’t do anything about deep seated staining, so colouring was still necessary.

Once the grout was dry the White grout colourant was painted onto the grout using a small brush wiping off any excess from the tile as I went. The Tile Doctor range of Grout Colourants come in eleven different colours and form an epoxy barrier over the grout preventing dirt from reaching the grout line and making it much easier to keep clean.

Bathroom Floor Grout After Restoration in Tooting SW17

Once the colourant had dried, I gave the floor a quick clean with Tile Doctor Neutral Tile Cleaner to get the ceramic tiles clean and the job was complete. The refreshed grout now has a consistent white appearance, and it really lifted the appearance of the bathroom.


Professional Restoration of a Bathroom Floor Grout in South London

Bathroom Floor Tile Grout Restoration in Tooting SW17 Read More »

Porcelain Tile Bathroom Grout Cleaning Wandsworth

Porcelain Tiled Bathroom Grout Renovation in Wandsworth

This is a great example of how easy it is to improve the appearance of a tiled bathroom. In this case the property was in Wandsworth and the tiles were Porcelain. My client had originally asked if I could re-grout their bathroom tiles which included the shower, wall and floor tiles in a room that was around 5sqm.

Porcelain Bathroom Tile Before Grout Renovation Wandsworth

We discussed the bathroom, and I pointed out that if we re-grout the tiles it would only get grubby again at some point. The problem is that the grout is cementitious which leaves it rough and attracts dirt easily. I recommended cleaning up the grout and then applying a grout colourant which would seal the grout in making it much easier to clean. I also offered to remove the silicone sealant between the edges of the bath and tiles. Unfortunately, once mould gets into the silicone, you’re fighting a losing battle, and it is best to just replace it.

Re grouting a Porcelain Tiled Bathroom Floor

Before colouring the grout, it needs to be prepared with an acidic cleaner that will not only remove any dirt but also etch the surface of the grout to improve the bond. Tile Doctor Pre-Treat Cleaner is the product we use for this purpose, but I decided in this case to go with a different product as the floor tiles had some old silicone on them which had been left to dry out. To resolve this, I used a different product in the range called Tile Doctor Grout Clean-Up which is primarily designed for removing grout haze.

Porcelain Bathroom Tile During Grout Renovation Wandsworth

It was only a small area, so I worked the Tile Doctor Grout Clean-Up into the tiles and grout by hand and then rinsed it off with water and extracted with a wet vacuum. The grout was then dried, and I started applying the Tile Doctor Grout Colourant in white with a small brush wiping off the excess as I went. The colourant is available in a range of eleven colours so there is usually a match for most situations. The colourant adds an epoxy barrier over the grout; this then prevents dirt from going into the grout line and means the floor is much easier to keep clean.

The last step in the renovation involved carefully stripping out the old silicone and replacing it with a new anti-mould variety. This last step really finished off the bathroom giving the impression it was a new installation.

My clients were very happy with the result, the bathroom was transformed, and they were relieved that the problem was solved so easily.

Porcelain Bathroom Tile After Grout Renovation Wandsworth

For aftercare cleaning I recommended regular use of Tile Doctor Neutral Tile Cleaner which is a mild yet effective tile and grout cleaning product that would help keep the bathroom looking good going forward.


Professional Restoration of a Porcelain Tiled Bathroom Grout in South London

Porcelain Tiled Bathroom Grout Renovation in Wandsworth Read More »

Scroll to Top