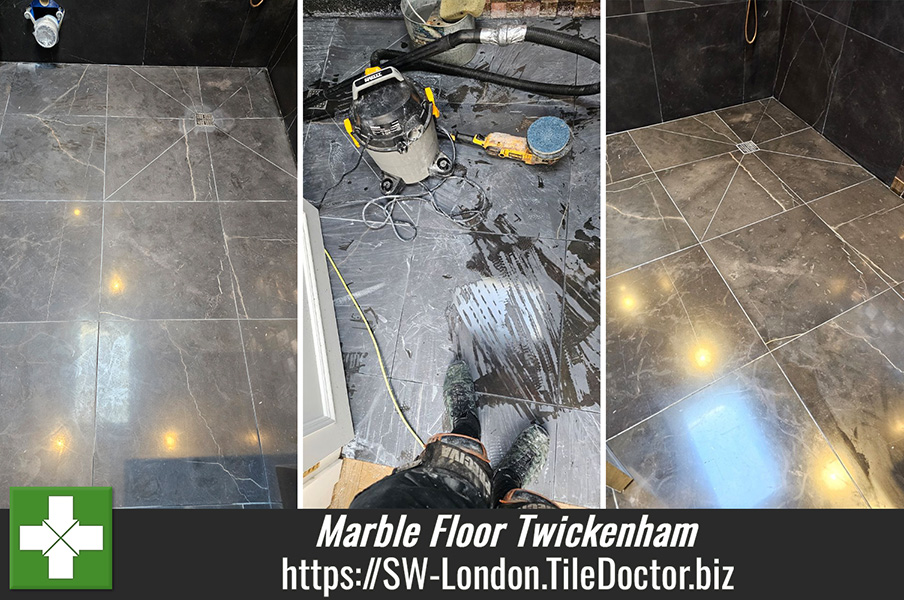
Shine Restored to a Dull Marble Tiled Wet Room Floor in Twickenham
I was asked to renovate a beautiful dark Marble tiled floor in the wet room of a property in Twickenham. My clients had the tiles installed ten years ago and had never had it professionally cleaned in that time, over the years they had maintained the stone poorly using general floor cleaning products.
Unfortunately, cleaning products with an acid base are not suitable for use on calcium-based stone like Marble, Limestone, Terrazzo and Travertine. The acid reduces the life of the sealer and can react with the calcium leaving stains and, in some cases, etching.

I was able to reassure the client that although the Marble looked beyond renovation it was not the case and that they could be restored to their original condition. They are not the only clients to have had this issue with polished stone and Tile Doctor has worked out a solution that can be used to restore their original polished appearance.
Relieved there was a solution I was asked to provide a quote which was accepted and a date for the work to start agreed.
Cleaning and Repairing a Marble Tiled Bathroom
To start we did a small test in the corner to be sure the renovation plan would be successful, although we have worked on many of these situations before, we still like to do a small verification test before starting any job.
All was well with the test, so the remedy was deployed to the whole floor. This begins with the application of a coarse 400-grit diamond burnishing pad to the floor worked in with water and a solution of Tile Doctor Pro-Clean. This combination removes any remaining sealer and dirt from the marble as well as removing etching. A wet vacuum is then used to extract the slurry from the surface.

Once satisfied the tile was ready for the next pad we then went to work with a medium 800-grit pad to deep clean and begin to hone the tile to restore its polished appearance using only water. After another rinse and extraction, we then moved onto the fine 1500-grit pad to bring the tile to a polished appearance again using water for lubrication.
The last pad is a super fine 3500-grit pad which is applied dry using only a small amount of water sprayed onto the tile to fully polish the marble. Our client didn’t want a high gloss, so we concentrated more on giving the tile a nice depth and low shine.
Sealing a Marble Tiled Bathroom
Once the Marble tiles had dried, they were sealed using Tile Doctor X-Tra seal, wiping small amounts into the tile at a time and then removing the excess with a clean cloth. This is especially important with oil-based sealers as too much oil left in the tile will make it sticky once dry and leave a light residue on the surface.

X-Tra Seal is rated for external use which makes it a good choice for wet areas, it’s also an impregnator that soaks into the stone protecting it from within and ensuring contaminates remaining on the surface where they can be cleaned away.
Once complete the Marble had a very attractive low gloss finish that was protected and ready for anything they could throw at it…anything but acid-based cleaners! It’s important that if you do ever accidently use the wrong cleaner you immediately wash it away with plenty of clean water. This will neutralise the acid and hopefully save the floor. For a sealed and polished floor like this I recommend Tile Doctor Stone Soap which contains a patina enhancer.

Professional Renovation of Marble Flooring in a South London Bathroom
Shine Restored to a Dull Marble Tiled Wet Room Floor in Twickenham Read More »