Renovating a 27-year-old Terracotta Tiled Kitchen Floor in Brentford
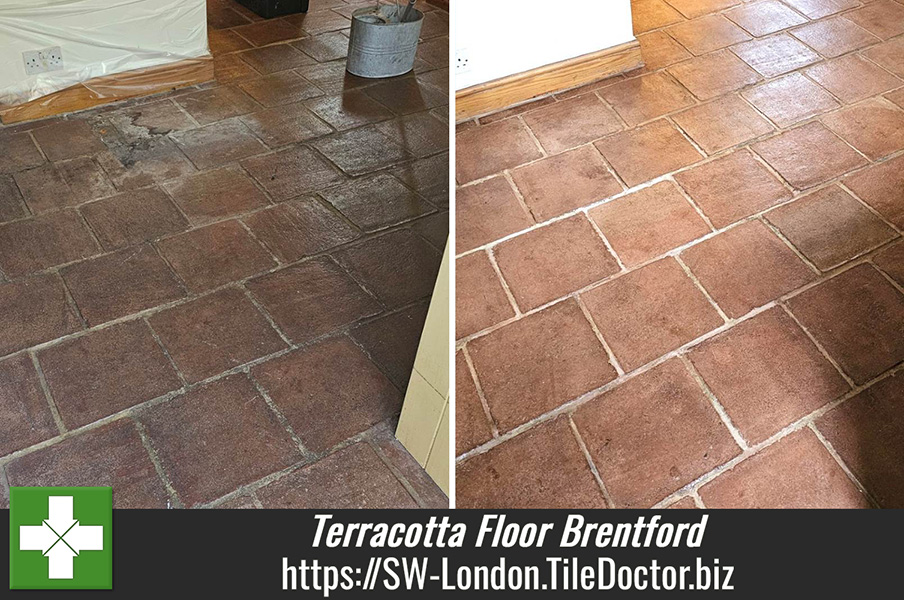
This job is a terracotta tiled kitchen floor at a property in Brentford that was laid 27 years ago and then sealed using wax. Since then, it hasn’t been properly maintained the entire time they have been down and was looking dark and permanently dirty.
 |
 |
Sometimes I can quote for renovating a floor from photos, however, in this case I made sure to book a survey as I could see that the tiles were heavily soiled, as you would expect from 27 years of use with no cleaning. On inspection of the tiles, I could see there was a lot of stripping that needed to happen to remove what was left of the wax.
I explained to the clients the process and the limitations and discovered their expectations for the floor. What the client was looking for was for the tiles to be as clean as possible with a good gloss on the top for easier mopping and maintenance. Once I had this information, I worked out a price and booked the work in.
Cleaning a Terracotta Tiled Kitchen
Once everything was protected, I carried out a damp proof reading on the tiles, noted it down and then applied Tile Doctor Remove and Go stripper to the top of the tiles. I mopped this around for 5 minutes and then agitated with a brush. Once happy it was taking effect, I used coarse carbide brush to scrub the solution in and remove the old sealer. Once complete and the resultant soiling rinsed away and extracted, I was able to inspect the floor and confirm the sealer had been removed.
Happy with stage 1, work progressed to the next step which involved covering the entire floor in a thick layer of Tile Doctor Acid Gel and allowed it to sit for 15 minutes. I did this to prevent too much penetration from the water during the next cleaning phase, but clay tiles like Terracotta react very well to acid during cleaning aiding the whole process. The next step was to use the rotary machine fitted with a black pad and give the tiles a good deep clean. I worked methodically ensuring not to flood the entire floor and again working in sections to allow me to vacuum off the surface water to avoid too much penetration into the tile.
Once happy with this I took a wire brush and cleaned the grout, although it had already mostly been cleaned by the carbide brush on the handheld it allows me to get down and close to the floor so that I can easily spot areas that may have been missed. I then said my goodbyes to the client and went away for 2 days, leaving a fan behind that they moved around to different sections of the floor each day until dry.
Sealing a Terracotta Tiled Kitchen
I stayed in contact with the client leading up to the sealing day and we determined the floor was ready to go. On arrival I took a damp meter reading and after comparing it to the one I took earlier was happy with the result.
Sealing the floor began with the application of Tile Doctor Seal and Go Extra and a paint pad. Four coats of sealer were applied. This is a fully breathable modern acrylic sealer that performs well on Terracotta improving its appearance and adding long lasting protection.
The following day the client called to say that the floor looked a bit dull in places, so I immediately booked them in for the bank holiday Monday and made my way back. On arrival I could see that not all areas of the floor had taken the sealer as well as I thought so I proceeded to apply another 6 coats. Terracotta is a very porous clay-based material and so this is not unusual.

The floor looked even better after this so I’m glad they requested a call back, visiting Terracotta floors more than once can happen, the most important thing is getting the correct results in the end with the least amount of disruption possible.

For aftercare cleaning I recommended the client use Tile Doctor Ph Neutral Cleaner. It’s a mild yet effective floor cleaner that’s safe to use on sealed tiles.
Professional Restoration of a Terracotta Tiled Kitchen in South London
Renovating a 27-year-old Terracotta Tiled Kitchen Floor in Brentford Read More »